 полная версия
Handwork in Wood
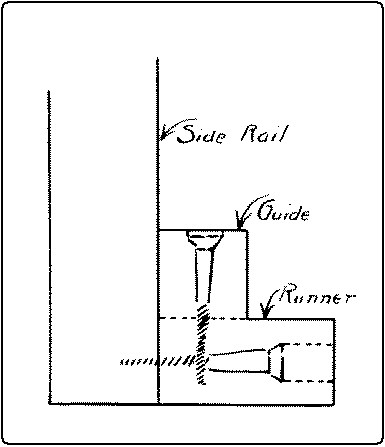
Fig. 295. Drawer Mechanism.
If there are two drawers, a double runner lies between, and is gained into the middles of the back rail and the stringer, and on it is a guide for both drawers, equal in width to the partition between the drawers. The drawers should run easily in their proper places. In order to insure this, the drawer should be slightly narrower than the opening which receives it. A little French chalk, rubbed on the sides and runners, makes the running smoother. Sometimes the opening for a drawer is cut out of the front rail, as in Fig. 296. In this case the drawer runners are supported between the front and back rails, into which they may be gained.
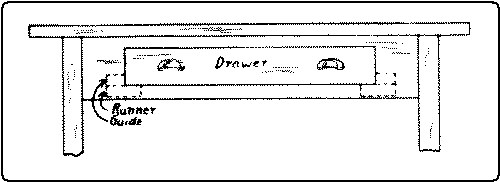
Fig. 296. Opening for Drawer Cut Out of Front Rail of Table.
For the making of the table top see edge-to-edge joint, p. 172. Dress up the top to size, taking special pains with the upper surface. If the grain is crossed, use the veneer-scraper, Fig. 151, p. 92, then sand, first with No. 1, then with No. 00 sandpaper, finish the edges carefully, and attach to the frame.
For fastening the top to the table rails, several methods are used. The top may be screwed to the rails by the screws passing thru the rails themselves either straight up, Fig. 297, A, or diagonally from the inside, B, or thru blocks or angle irons, C, which are screwed to the inside of the rails, or thru buttons, or panel irons, D, which are free to move in a groove cut near the top of the rail. The last method is the best because it allows for the inevitable shrinkage and swelling of the top.

Fig. 297. Methods of attaching Table Top to Rails.
Chairs may be so simplified in form as to be possible for the amateur to construct. The two front legs and the rail and stretcher between them offer little difficulty because the angles are square.
The two back legs, may, for the purpose of simplification, be kept parallel to each other and at right angles to the seat rails between them, as in Fig. 298, A, and not at an angle as in B. The joining of the back will then offer little difficulty. The principal difficulties lie in the facts that for comfort and appearance the back of the chair should incline backward both above and below the seat, and that the back of the seat should be narrower than the front. By keeping at right angles to the floor the part of the back legs which receives the seat rail, the side seat rails will meet the back legs at a right angle in a side view, Fig. 298. The back legs should be slightly shorter than the front legs, as shown in D.
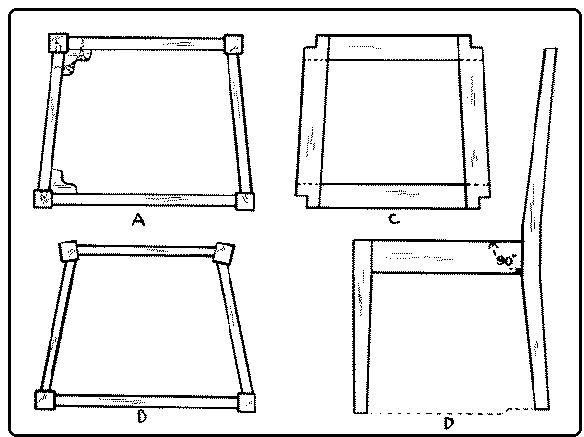
Fig. 298. Chair Construction.
The second difficulty involves the making of inclined mortise-and-tenon joints, A, where the side rails fit into the legs. The making of these can be facilitated by laying out a plan of the full size and taking the desired angles directly from that. It is common to reinforce these joints with corner blocks glued and screwed in place as shown in A. If there are additional rails below the seat rails, the easiest way to fit them in place is first to fit and clamp together the chair with the seat rails only, taking pains to have all angles perfectly true, and then to take the exact measurements for the lower rails directly from the chair. The same method may be used for laying out a stringer between the lower rails.
If it is desired to bow the rails of the back, which are above the seat rail, this can be done by boiling them in water for 30 minutes and then clamping them over a form of the proper shape, with a piece of stiff sheet iron on the outside, as in Fig. 299. They should be thoroly dried in a warm place. Then the tenons may be laid out on the ends parallel to a straight-edge laid along the concave side. The chair bottom may be made of solid wood, either flat or modeled into a "saddle seat;" it may be covered with cane or rush, or it may be upholstered.
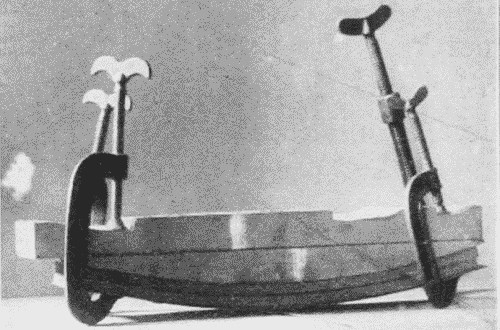
Fig. 299. Bending Boards into Shape after Boiling Them.
To upholster a chair seat, a frame should first be made of the shape shown in Fig. 298, C. The strips are about 2" wide and ½" thick with their ends half-lapped. The seat rails are rabbeted ½" deep and ½" wide to receive this frame, which should be ⅛" smaller all around than the place to receive it. The returns at the corners fit around the legs at ⅛" distance from them. This ⅛" provides space for the coverings. After the frame is fitted, it is covered with 3" webbing tacked firmly to the upper side. The webbing which goes back and forth is interwoven with that which goes from right to left. Over this is stretched and tacked (also to the upper side) a piece of unbleached muslin. A second piece of muslin is tacked to the back edge and part way along the side edges, leaving for the time the corners unfinished. In the pocket thus formed horsehair or other stuffing is pushed, care being taken to distribute it evenly and not too thick. When the pocket is filled, the muslin is tacked farther along the sides and more hair put in, until the front is reached, when the muslin is tacked to the front edge. The corners are now drawn in tight, a careful snip with the scissors parting them diagonally so as to lie in well. The partings may be turned down and tacked on the under side of the frame.
Finally the leather or other covering is stretched over the whole as evenly as possible. The corners should be left to the last, then clipped diagonally to the exact inside corner and the partings drawn down and tacked, as was the muslin. The superfluous leather may then be trimmed off, and the seat should fit in its place. Or the seat frame may be omitted, and the coverings tacked directly to the chair rails.
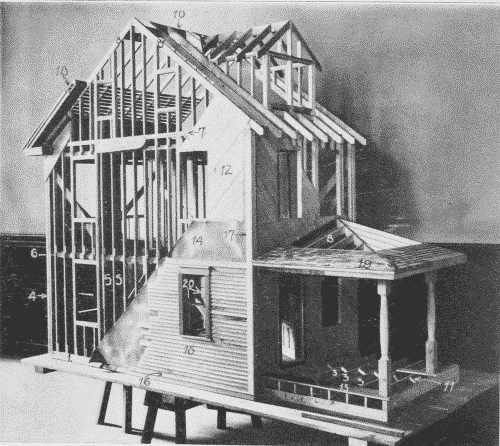
Fig. 300. House Construction.
The balloon-frame house is a typical form of framed construction, Fig. 300. The essential parts of a balloon-frame are:
1. SILL, 4" × 8", which rests on the foundation.
2. BEAMS, 4" × 8", which rest on the cellar posts, 6"×6". (Not shown in illustration.)
3. FLOOR JOISTS, 2" × 8", which rest on the sill and beams.
4. CORNER POSTS, 4" × 6", with 2"×4" studs nailed to them.
5. STUDDING, 2" × 4", which stand 16" between centers.
6. WALL RIBBON, or girt, 1" × 8", which supports the upper story joists.
7. PLATES, two 2" × 4" nailed together, resting on studs.
8. RAFTERS, 2" × 6", which support the roof.
9. TIE-BEAMS, 2" × 6", which prevent the roof from spreading the walls. (Not shown in illustration.)
10. RIDGE-POLE, 2" × 8", against which the rafters butt.
11. BRIDGING, 2" × 2", which stiffens the floor joists.
12. SHEATHING, (1" thick), put on diagonally to brace the building. The rest is covering.
13. FLOORING, (See also Fig. 301.)
In flooring, Fig. 301, the boards are made narrow so as to reduce the size of openings at the joints when they shrink, and also to reduce the tendency to warp. They may be laid side by side as in the cheapest floors, or matched to close the joint. For difference between slash- and comb-grain flooring, see Fig. 55, p. 42.
14. BUILDING PAPER.
15. SIDING OR CLAPBOARDS, (See Fig. 301.) may either overlap without a joint or be rabbeted to fit. The best siding is rabbeted.
16. WATER-TABLE.
17. CORNER-BOARD.
18. FURRING.
19. SHINGLES.
20. LATHING.
21. CEILING, Fig. 301, consists of matched boards having a "bead" to disguise the joint and give a decorative effect.
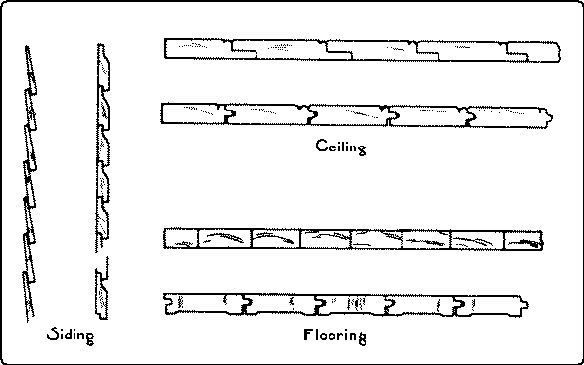
Fig. 301. Siding, Ceiling, Flooring.
TYPES OF WOODEN STRUCTURES
References19
Simple Joined Structures.
Benson, pp. 32-37.
Goss, pp. 91-96.
Noyes, School Arts Book, 6: 89, 179.
Wheeler, pp. 86, 219-227, 376.
Sickels, p. 120.
Griffith, pp. 84-104.
Panel and Cabinet Construction.
Goss, pp. 117-118, 148-151.
Compton, pp. 146-151.
Sickels, p. 134.
Wheeler, pp. 366-372.
Framed Structures.
Crawshaw.
Wheeler, pp. 203-206, 238-297.
Sickels, p. 124.
Building Trades Pocketbook, pp. 221, 230.
Coverings.
Sickels, pp. 128-131.
Goss, pp. 141-144.
Chapter IX.
PRINCIPLES OF JOINERY.20
1. Avoid multiplication of errors by making all measurements (as far as possible) from a common starting point, and laying off all angles from the same line or surface. Illustrations of this principle are as follows: Before proceeding with other processes, a working face and working edge and as many other surfaces as will finally appear in the finished piece, should be trued up. At least the working face and working edge are essential to the proper "lay-out" of the piece, whenever measurements are made from an edge.
In laying out a series of measurements, it is important, when possible, that the rule be laid down once for all, and the additions be made on that, rather than that the rule should be moved along for each new member of the series.
In scoring around a board with knife and try-square, the head of the try-square should be held against the working face in scoring both edges, and against the working edge in scoring both faces, and not passed from one surface to another in succession.
In the laying out of a halved joint, Fig. 265, Nos. 15-19, p. 178, the gaging is all done from what will be one of the flush surfaces of the joined pieces. Then, if the gaged line should be slightly more or less than half the thickness of the pieces the closeness of the joint would not be affected.
2. When possible, in laying out a joint, use the method of superposition. Fig. 302. By this is meant the method by which the lay-out of one member is obtained directly from the other by laying (superposing) the latter on the former and marking or scribing the needed dimensions directly, instead of by measurement. It has the advantages of simplicity, speed, and greater probability of fit.
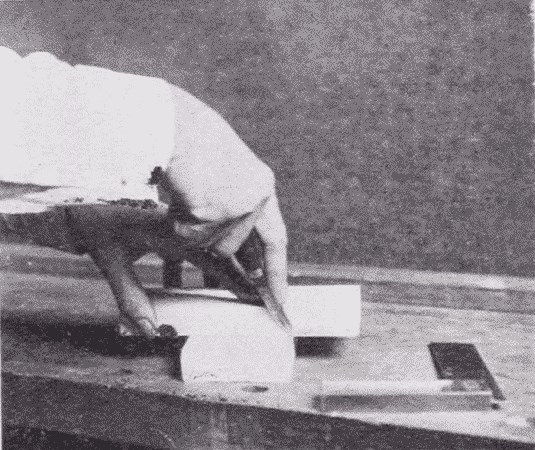
Fig. 302. Marking by Superposition.
Familiar illustrations are in the making of halved joints, Fig. 265, Nos. 15-19, p. 178, dovetail joints, Fig. 267, Nos. 42-45. p. 180, and scarfed or spliced joints, Fig. 264, Nos. 4-7. p. 177.
3. Work systematically. In case the same process is to be repeated on a number of parts, complete this process in all before taking up another process. This is the principle of the division of labor applied to the individual workman.
In laying out duplicate or multiple parts, the proper cross measurements should be carefully laid out on one piece and then transferred with a try-square to the other parts laid accurately beside it. So when a number of like pieces are to be gaged, all the parts requiring the same setting should be gaged before the gage is reset for another gaging. This is a great saving of time and insures accuracy.
In making a number of like parts, if they are not too large much of the work can often be done in one piece before it is cut up. For example, to make a number of slats from a given piece of wood, the piece may first be brought to such dimensions that the length will be correct for the finished pieces and the thickness of the piece be equal to the width of the slats, Fig. 303. The face may then be gaged with a series of lines so that every other space will be equal to the required thickness of each slat, and the alternate spaces be just sufficient for the saw kerf and dressing. The slats may then be ripped apart and dressed to size.
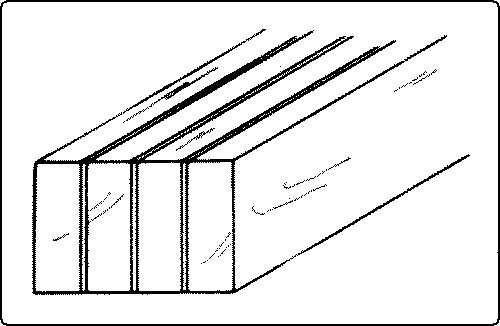
Fig. 303. Making a Number of Like Pieces from a Given Piece.
Or a long strip may be planed to thickness and width and then be sawn up and finished to the proper lengths. For example, in a mitered picture-frame it may be convenient to plane up two pieces, each one long enough to make one long side and one short side.
In fitting up framed structures each part when fitted should be distinctly marked, so that there may be no confusion in assembling.
4. Where practicable secure the same conditions of grain in different elements of joined structures.
Illustrations of this are as follows: The grain of the sides of a box should run continuously around the box, or, in the case of a tall, slim box, the grain of all the sides should run up and down. In either case, the grain in the different sides is parallel. In a rubbed joint, Fig. 269, No. 70, p. 182, to be planed down afterward, in case the grain is not straight, much trouble in planing may be saved if the different pieces are laid so that they can all be planed smooth in the same direction. This may not be possible where the boards are joined so as to match the grain, as in quartered oak, or where the annual rings of slash boards are made to alternate in direction so as to lessen warping, Fig. 280, p. 186.
5. Where possible, allow for shrinkage without prejudice to construction.
The most obvious illustration of this principle is panel construction. In a panel, the frame, which is comparatively narrow, follows the principal dimensions, and hence does not seriously shrink or swell itself. But the panel, which is grooved into the frame can shrink or swell without harm to the general structure.
In a gained joint, as in a case of shelves, Fig. 266, No. 29, p. 179, the gain in the uprights does not extend quite to the front of the shelves, and there is a corresponding slight shoulder at the front end of the shelf, so that if the shelf and support shrink unevenly, no gap will be apparent.
A drawing-board, Fig. 280, p. 186, is so made that it can shrink or swell without losing its flatness. Shingles when properly laid, can shrink or swell without the roof leaking.
6. Where feasible, undercut joined surfaces so as to give clearance on the inside and insure a tight appearance. But glued surfaces should be made to meet flat.
Illustrations of this principle are as follows: The inner end of the socket in a dovetail joint, Fig. 267, No. 48, p. 180, may be undercut slightly so as to insure the pin's falling close into place.
The shoulder of any tenon may be undercut so as to allow the edges of the tenoned piece to close up tight against the mortised piece.
In an end-lap halved joint, Fig. 265, No. 17, p. 178, the edges should meet all around; if they are to be glued together, they should not be undercut or they will not glue well.
In matched flooring, the underside of the boards is slightly narrower than the upper side so that the joint may close on the upper side without fail, Fig. 301, p. 201. The ends of flooring boards are also slightly beveled so as to make a tight fit on the upper side.
7. Select the simplest form of joint and use the smallest number of abutments (bearing surfaces) possible, because the more complicated the joint or the greater the number of bearing surfaces, the less likelihood there is of a sound and inexpensive construction.
Illustrations of this principle are as follows: Usually a single mortise-and-tenon joint is better than a double one because of simplicity, strength and ease of making. Where much surface is required for gluing, a double one may be better.
In a dovetail dado, Fig. 266, No. 28, p. 179, it is usually sufficient to make the dovetail on one side only.
Many very elaborately spliced joints have been devised, which have no practical advantage over the simple ones, Fig. 264, Nos. 4-7, p. 177.
A butt joint, Fig. 264, No. 11, is stronger than a mitered joint, Fig. 268, No. 52, in a box, for the latter is almost sure to shrink apart. Where appearance is important, a ledge and miter joint has the advantage of both, Fig. 268, No. 58.
8. Keep a due proportion of strength between the fastenings (joints) and the pieces fastened: i. e., the construction should neither be frail on the one hand, because the pieces of wood are weakened by too much cutting, nor clumsy, on the other hand, because then the fastenings would be inordinately strong. In other words, the different parts should be equally strong.
Illustrations of this principle are as follows: In a fished joint, Fig. 264, No. 2, the plate should be attached so as to reinforce the splice at the weakest point.
In a scarf joint, Fig. 264, Nos. 5 and 7, the angle should be oblique enough to give the greatest leverage.
In a tusk tenon, Fig. 267, No. 40, the tenon is made but one-sixth the thickness of the timber, whereas the tusk is made much larger.
Where a mortise is to be cut in a timber bearing weight, it should be cut in the neutral axis, where the cutting of fibres will weaken it least.
In the mortise-and-tenon of a table-rail, Fig. 267, No. 43, there should be a wide shoulder above the tenon of the rail so that the top of the leg above the mortise will not shear out. The mortise should be as near the outside of the leg as possible so that the inner corner of the leg may remain strong. The tenon should be strong enough to share the strain with the shoulders.
A dado joint, Fig. 266, No. 25, should not be so deep as to weaken the supporting board.
A tenon should not be so large as to weaken the mortised piece.
Pins or other fastenings, Fig. 267, Nos. 38 and 39, may weaken rather than strengthen a joint if they are so placed or are so large as to shear or crush their way thru the timber.
9. Place each abutting surface in a joint as nearly as possible perpendicular to the pressure which it has to transmit.
Illustrations of this principle are as follows: the angle in a strut joint, Fig. 266, No. 62, should be equally divided between the two beams.
The thrust joint, Fig. 268, No. 63, in a bridge truss, is exactly at right angles to the pressure.
It is on account of this principle that a spliced joint for compression, Fig. 264, No. 4, is different from a spliced joint for tension, No. 5; and that a housed braced joint, Fig. 269, No. 66, is better than a plain braced joint, No. 65.
A joint to resist vertical cross strain is stronger when scarfed vertically than horizontally.
THE PRINCIPLES OF JOINERYReferences21
Goss, p. 132.
Adams, p. 12.
Rivington, Vol. I, p. 57.
Chapter X.
WOOD FINISHING
STAINSThe function of stains is to change the color, and to enchance the grain and texture of the wood. Stains may be divided into four general classes, which are not, however, entirely distinct. (1) Oil stains, (2) Water stains, (a) made from anilines, (b) made from dyes other than anilines, (3) Spirit stains, (4) Stains due to chemical changes.
(1) Oil stains. Advantages: they are easily prepared, are easy to apply evenly, and they do not raise the grain. Disadvantages: they cover the grain somewhat, are apt to give a muddy effect, they do not penetrate very deeply into the wood, and it is impossible to stain hard wood dark with them and at the same time keep the grain and texture of the wood clear. A convenient form in which to handle these pigments is Devoe's "coach colors," ground in japan. To prevent evaporation from cans once opened, it is well to keep them partly filled with water and the water covered with a little oil. For use, the pigments are thinned with turpentine or benzine, in the proportion of one pound of color to one-half gallon of turpentine or benzine. Benzine is much cheaper than turpentine, but evaporates more quickly. The addition of a little boiled oil gives a body to the stain, so that when the wood is well rubbed down a soft lustre can be had without any further finish. The stain should be applied with a brush to the wood, which may then be rubbed clean with cotton waste. Oil stains penetrate hard woods better when the wood has first been fumed in ammonia. (See below, p. 211). Or, the addition of a little ammonia to the stain just before applying aids it in penetrating the wood.
The pigments most used for oil stains are: burnt and raw umber, burnt and raw sienna, Vandyke brown, drop black, and medium chrome yellow. These colors may be varied by mixing. For example, for a green stain, take two parts of drop black and one part of medium chrome yellow, and dissolve in turpentine or benzine. The addition of a little vermilion gives a grayer green. The green may be made bluer by the addition of Prussian blue, but the blue already contained in the black gives a soft, pleasant green.
For antique oak, add a trifle of burnt umber and black to raw sienna thinned to the right consistency.
For a reddish brown, thin burnt umber to the right consistency. This may be grayed by the addition of a little green.
A walnut stain may be had by adding a little Venetian red to asphaltum, thinned with turpentine or benzine.
Aniline oil stains. Advantages: the colors are clear and easily obtainable. Disadvantages: the colors are likely to be crude and too bright, and unless great care is taken the tones are metallic and not soft enough to suit wood. It is necessary to purchase colors soluble in oil. These can be had of William Zinnser and Company, 197 William Street, New York. Four colors are necessary to get the desired shades, Bismarck brown, dark yellow, dark blue, and black. Bismarck brown comes in powdered form at $2.40 per lb., dark yellow comes in powdered form at $2.40 per lb., dark blue comes in lumps at $3.20 per lb., black comes in lumps at $2.40 per lb. These may be dissolved in three ounces of turpentine to one ounce of boiled oil, to one teaspoonful of color, a process that will take place much faster if the mixture is heated. Great care must be taken, however, not to set fire to the turpentine. When cool, thin with turpentine to the proper consistency, apply to the wood with a brush and rub clean with cotton waste.
(2) Water Stains. Advantages: they are cheap and clear and do not obscure the grain as oil stains are likely to do, and they penetrate deeply into the wood, especially when applied hot. They may be made of any coloring matter that is soluble in water, and are particularly good for hard woods and for use in large quantities. It is possible to stain wood much darker with them than with oil stains. Moreover, the brushes used with them are easily taken care of. Disadvantages: they are difficult to prepare and they raise the grain of the wood. The former disadvantage may be overcome by buying them all prepared.
The difficulty of the raising of the grain is to be obviated either by washing the wood in water and, when dry, rubbing down with sandpaper before applying the stain, or rubbing down after staining and re-staining when necessary.
a. Water stains made from anilines. Aniline stains are likely to fade, but the addition of a little vinegar is said to hinder fading. For Mahogany, dissolve 1 oz. Bismarck brown in 3 quarts of boiling water. Use when cool.
b. Water stains made from dyes other than anilines. The number of these is legion; some of the simpler are given.
Reddish Brown. Dissolve extract of logwood of the size of a walnut in ½ cup (4 oz.) of hot water. Apply hot to wood repeatedly until desired color is obtained.
Black. Dissolve extract of logwood of the size of a walnut in ½ cup (4 oz.) of boiling water. Add a teaspoonful of alum. Apply repeatedly until the wood is dark brown. Prepare acetate of iron according to directions for making dark brown, on next page. Apply this to wood already browned with logwood. If the grain is raised, sandpaper lightly, or rub with steel wool and then with boiled oil.
(3) Spirit Stains. These are expensive and hence little used. A few illustrations are given.22
Black. Aniline black, cut in alcohol, gives a bluish effect but if the wood thus stained is rubbed with raw linseed oil, it becomes black.


