Полная версия
Cake: 200 fabulous foolproof baking recipes


Contents
Title Page
Introduction
01/ Easy
02/ Fast
03/ Healthy
04/ Classic
05/ Teatime
06/ Dessert
07/ Children’s
Decorating ideas
08/ Celebration
09/ Festive
Cake essentials
List of Recipes
Thank yous
Copyright
About the Publisher

Introduction
I love every type of cake, whether light and buttery or dense and fudgy. In fact, I have adored baking ever since I was a child, when I began making cakes with my mother and sister. I was transfixed by the whole process – from stirring the ingredients in a big bowl to popping the filled tin in the oven and waiting for the magic to happen. Then, hey presto, the mixture had turned into a proper cake, beautifully risen and golden and with mouth-watering smells filling the kitchen. Our finished creation was then carefully removed and decorated before being placed on a plate and proudly presented to the rest of the family or to friends.
I know I’m not alone in my passion for cakes. Indeed, I get asked for my cake recipes more than any other type of dish! This book is aimed at anyone who has ever enjoyed a slice of cake – whether baking is your favourite pastime or if you’ve never tried it before. My previous book, Bake, was dedicated to all types of baking, from pies and casseroles to puddings and biscuits. This volume focuses exclusively on cake baking, showing you how to quickly master the basics, add effortless decoration and expand your repertoire of great-looking, great-tasting cakes to give, share and enjoy.
There is always something in my diary that offers the perfect excuse to bake a cake. With this in mind, I’ve divided the book into sections, each with a selection of cakes for different occasions, be it a simple picnic or coffee with a friend, or an elaborate event like a wedding, birthday or special celebration. You’ll find chapters devoted to fast cakes, festive cakes, classic and teatime cakes, novelty cakes for children’s parties and recipes catering specifically for people with allergies or food intolerances.
The recipes in this book are all easy to follow, with no particular level of skill or experience required. Most are quick and simple to make, while a few will take a little more time and effort. The sections on cake decoration include recipes for honeycomb, chocolate squares and fondant-icing shapes, each of which will help you add that special finishing touch or real ‘wow’ factor. Icing and decoration are usually tailored to specific cakes, but you can experiment with mixing ideas from different recipes and be as creative as you like.
There is something in Cake for everyone, from the casual cook to the committed baker, and I hope you enjoy using this book as much as I’ve enjoyed creating the recipes for it. I believe that divine recipes are made to be shared and cake tastes best when enjoyed with friends or family. It’s true that cakes are an indulgence and not something to have every day, but eaten every so often they are a genuine treat. Even a tiny sliver can really brighten your day or transform an otherwise ordinary get-together into a memorable occasion – magic not only in the making but in the eating!


You don’t always need a special reason to bake a cake and this chapter is full of cakes that are really easy to put together. The recipes are not elaborate; there are no grand tiers or complicated icings here. The cakes are straightforward without involving too much technique or hours of labour. These cakes are the ones that I keep in a tin in the kitchen, ready for when a friend calls round or invites me over for coffee. They are also good for popping into a lunchbox or at the end of a simple supper, when you don’t need a fancy dessert, just a little slice of something sweet. Easily achievable and simply delicious, these are cake recipes that you’ll return to again and again.
01/ Easy
Lemon poppy-seed cake
Lemon poppy-seed muffins
Apricot, pistachio and saffron muffins
Pear and ginger muffins
Coconut and lime cake
Apple and walnut cake
Bakewell cake
Marbled chocolate crumble cake
Lemon crumble cupcakes
Lemon curd
Tropical cake
Toscatårta or Swedish almond cake
Lemon and rosemary polenta cake
Orange sour-cream cake

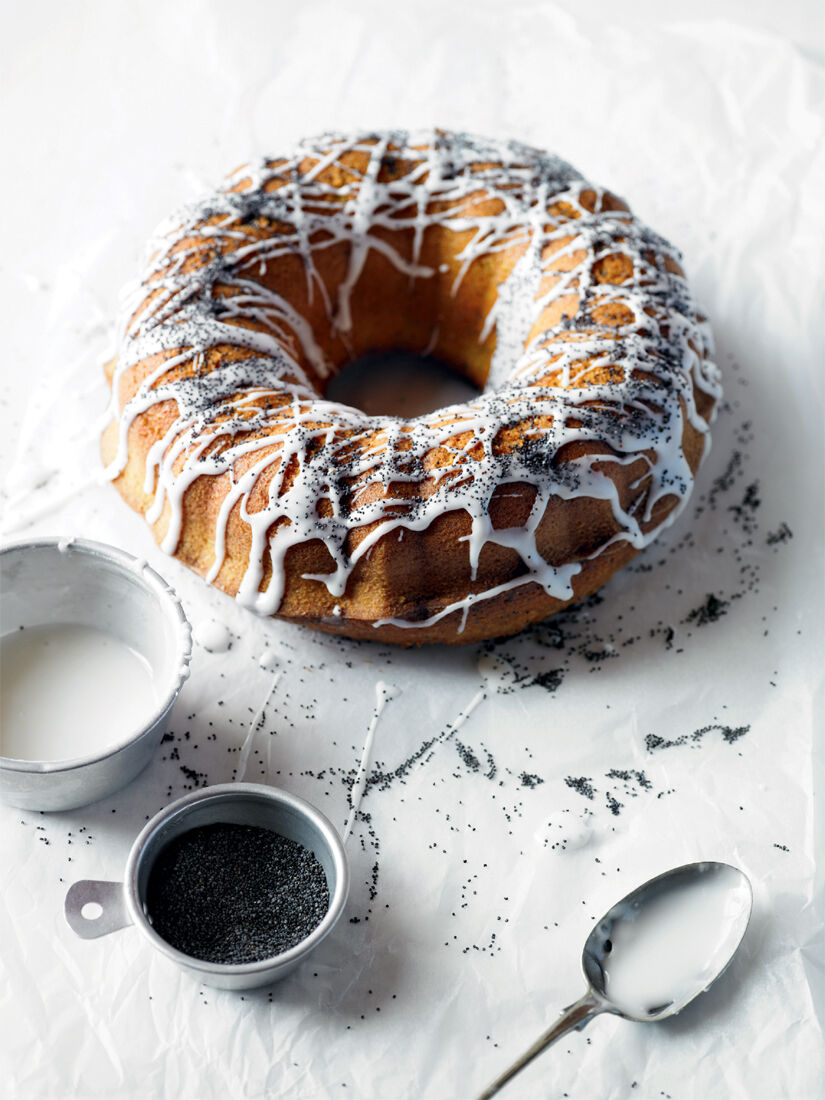
Lemon poppy-seed cake
Poppy seeds are used in cakes and many other dishes across the world, their fragrant nutty taste going especially well with the citrus flavour of lemon or orange. There is a lot of milk in this recipe, which makes the crumb very tender and soft. It’s baked in a bundt tin, which gives more of a crusty outer layer, though if you don’t have one, a standard round cake tin would do just as well, or you could use the mixture to make muffins. If you like, you could decorate with candied orange slices, placing these on the iced cake instead of sprinkling over the poppy seeds.
Prep time: 15 minutes
Baking time: 50–70 minutes
Ready in: 1 hour 40 minutes
Serves: 10–14
325g (11½oz) plain flour, plus extra for dusting
1½ tsp baking powder
1½ tsp salt
400g (14oz) caster sugar
25g (1oz) poppy seeds, plus 1–2 tsp to decorate
225ml (8fl oz) sunflower or vegetable oil, plus extra for greasing
4 eggs
1 tsp vanilla extract
325ml (11½fl oz) milk
Finely grated zest of 1 lemon
Candied orange slices, to decorate (optional)
For the icing
200g (7oz) icing sugar, sifted
3 tbsp lemon juice
2.5 litre (4⅓ pint) bundt tin (about 23cm/9in in diameter) or 25cm (10in) diameter cake tin
Preheat the oven to 180°C (350°F), Gas mark 4, then grease the bundt tin with sunflower or vegetable oil and dust with flour. If you’re using a standard type of cake tin, grease the sides and line the base with a disc of baking parchment.
Sift the flour, baking powder and salt into a large bowl, add the sugar and poppy seeds and mix together.
In a separate bowl, whisk together the remaining ingredients until combined. Tip this mixture into the dry ingredients and mix together using a wooden spoon to make a smooth batter. You may need to use a whisk briefly to get rid of any lumps of flour.
Tip into the prepared tin and bake for 50–60 minutes (60–70 minutes if using a standard cake tin). When cooked, the cake should feel springy to the touch and a skewer inserted into the centre should come out clean.
Remove the cake from the oven and allow to sit for just 2 minutes, then loosen the edges with a small, sharp knife, place a wire rack upside down on top of the cake and carefully turn it over. Gently remove the tin and allow to cool completely.
While the cake is baking, or while it’s cooling, you can make the icing. Beat the icing sugar and lemon juice together until smooth. Carefully transfer the cake to a cake stand or serving plate, then drizzle the icing backwards and forwards from the centre to the outside of the cake in a zigzig pattern. Sprinkle over the poppy seeds straight away and the candied orange slices, if you’re using them, before the icing has a chance to dry.
Orange poppy-seed cake
Make the cake as in the recipe, replacing the lemon zest in the sponge with the finely grated zest of 1 orange and using orange juice instead of lemon juice in the icing.
Lemon poppy-seed muffins
Prep time: 10 minutes
Baking time: 20–25 minutes
Ready in: 1 hour
Makes: 12 muffins
215g (7½oz) plain flour
1 tsp baking powder
Pinch of salt
265g (9½oz) caster sugar
15g (½oz) poppy seeds, plus 2 tsp for sprinkling
150ml (5fl oz) sunflower or vegetable oil
3 eggs
½ tsp vanilla extract
215ml (7½fl oz) milk
Finely grated zest of ½ large lemon
For the icing
130g (4½oz) icing sugar, sifted
1–2 tbsp lemon juice
12-cup muffin tray and 12 muffin cases
Preheat the oven to 180ºC (350ºF), Gas mark 4, and line the muffin tray with the paper cases.
Mix the ingredients for the sponge following the main recipe, then divide the batter between the paper cases, filling each case three-quarters full.
Bake for 20–25 minutes or until lightly golden on top and springy to the touch. Allow to cool in the muffin tray for 5 minutes, then transfer to a wire rack to cool down fully.
Make the icing, then drizzle it over the cooled muffins and sprinkle with the poppy seeds to finish.
Apricot, pistachio and saffron muffins
I adore the combination of the sweet juicy apricots with the exotically perfumed saffron. Use peaches (fresh or tinned) in place of the apricots if you wish. These muffins are delicious served with a spoonful of crème fraîche and a piping-hot cup of coffee or tea.
Prep time: 10 minutes
Baking time: 35 minutes
Ready in: 1 hour 15 minutes
Makes: 12 muffins
225ml (8fl oz) buttermilk
2 eggs
Pinch of saffron
300g (11oz) plain flour
2 tsp baking powder
½ tsp bicarbonate of soda
½ tsp salt
200g (7oz) caster sugar
125g (4½oz) butter, cut into 1cm (½in) cubes
300g (11oz) fresh or tinned apricots (about 7 fresh apricots, stones removed), roughly chopped
75g (3oz) unsalted shelled pistachios, roughly chopped
12-cup muffin tray and 12 muffin cases
Preheat the oven to 180ºC (350ºF), Gas mark 4, and line the muffin tray with the paper cases.
Place the buttermilk, eggs and saffron in a bowl and whisk together until smooth.
In a separate large bowl, sift together the flour, baking powder, bicarbonate of soda and salt and mix in the sugar. Add the cubes of butter and rub in with your fingertips until the mixture resembles coarse breadcrumbs.
Add the wet ingredients and mix together, then fold in the apricots and pistachios. Spoon the batter into the muffin cases, filling each case about three-quarters full.
Bake for about 35 minutes or until golden brown on top and springy to the touch. Allow the muffins to cool for 5 minutes, then remove from the tin and place on a wire rack to finish cooling.
Pear and ginger muffins
These soft, moist muffins are flavoured with chunks of pear and the gentle heat of ginger. The riper the pears, the sweeter the muffins will be. They would be perfect for a picnic or a quick snack on the run.
Prep time: 10 minutes
Baking time: 20 minutes
Ready in: 45 minutes
Makes: 12 muffins
275g (10oz) plain flour, sifted
200g (7oz) caster sugar
2 tsp baking powder
1 tbsp ground ginger
1 tsp salt
4 eggs, beaten
150ml (5fl oz) vegetable oil
300g (11oz) pears, peeled, cored and cut into 1cm (½in) dice
12-cup muffin tray and 12 muffin cases
Preheat the oven to 180°C (350°F), Gas mark 4, and line the muffin tray with the paper cases.
Place all the ingredients, except the pears, in a large bowl and whisk together until smooth, then fold in the pears and divide between the muffin cases, filling each case three-quarters full. Bake for about 20 minutes or until well risen, golden and feeling springy to the touch.
Remove from the oven and allow to cool for 5 minutes, then take from the muffin tray and place on a wire rack to cool down fully.
Apple and ginger (or cinnamon) muffins
Follow the recipe above, replacing the pears with the same quantity of chopped eating apples and either keeping the ginger or replacing it with 2 teaspoons of ground cinnamon.
Coconut and lime cake
Ingredients grown together seem to go together. Just as apples and blackberries are a perfect match, so too are coconut and lime. The coconut flavour in this recipe comes from both desiccated coconut and coconut milk. The coconut milk is an unusual addition, but it is nonetheless an excellent baking ingredient that helps make the cake lovely and soft due to its high oil content. If at all possible, serve this cake outside on a summer’s evening, ideally accompanied by piña coladas or margaritas!
Prep time: 20 minutes
Baking time: 30–35 minutes
Ready in: 1 hour 45 minutes
Serves: 8–12
150ml (5fl oz) coconut milk (see the tip)
50g (2oz) desiccated coconut
25ml (1fl oz) milk
250g (9oz) butter, softened, plus extra for greasing
250g (9oz) caster sugar
3 eggs, beaten
Juice and finely grated zest of 2 limes
275g (10oz) self-raising flour
50g (2oz) coconut flakes, toasted (see the tip), to decorate
For the icing
15ml (½fl oz) coconut milk
250g (9oz) icing sugar, sifted
Juice of ½–1 lime
20cm (8in) square cake tin with 5cm (2in) sides
Preheat the oven to 180°C (350°F), Gas mark 4, then butter the sides of the cake tin and line the base with a square of baking parchment. Pour the coconut milk into a saucepan and place over a high heat. As soon as it boils, remove from the heat and stir in the desiccated coconut and the milk.
Cream the butter until soft in a large bowl or in an electric food mixer. Add the sugar and beat until the mixture is light and fluffy.
Whisk the eggs together with the lime juice and zest in a small bowl, then gradually add the eggs to the creamed butter mixture, beating all the time. Sift in the flour and fold in gently to mix.
Tip the batter into the prepared tin and smooth the top with a spatula or palette knife. Place in the oven and bake for 30–35 minutes. When the cake is ready, a skewer inserted into the centre will come out very slightly sticky.
Leave to cool in the tin for 10 minutes, then use a small, sharp knife to loosen the edges and carefully remove the cake from the tin before leaving on a wire rack to finish cooling.
As the cake cools, make the icing. In a bowl, whisk together the coconut milk, icing sugar and the juice of half a lime, adding more if the mixture seems too stiff. Carefully pour the icing over the cake, to cover it in an even layer, then sprinkle over the toasted coconut flakes.
Tip This recipe uses a small (165ml) tin of coconut milk. If you can’t get a small tin, then use a larger one and store any leftover milk in the fridge, where it will keep (in an airtight container) for up to four days, or it can be frozen. Coconut flakes can be toasted in a dry, hot frying pan for a few minutes.

Apple and walnut cake
Some spices have their favourite accompaniments: cinnamon, for example, seems to prefer apple to almost anything else. The two are combined here with crunchy walnuts and muscovado (soft brown) sugar for its unrefined, caramel flavour. I’ve used some wholemeal flour in this recipe as I like the difference it makes, adding a little weightiness in both texture and taste. The cake makes a delicious dessert, eaten warm with whipped cream, or you could serve it in the afternoon with tea.
Prep time: 20 minutes
Baking time: 55 minutes
Ready in: 1 hour 45 minutes
Serves: 10–12
300g (11oz) plain flour
1 tsp ground cinnamon
2 tsp baking powder
½ tsp bicarbonate of soda
1 tsp salt
175g (6oz) wholemeal flour
225g (8oz) soft light brown sugar
175ml (6fl oz) sunflower oil, plus extra for greasing
3 eggs
150ml (5fl oz) milk
3 eating apples, peeled, cored and chopped into 1cm (½in) dice
75g (3oz) walnuts, roughly chopped
For the glaze
150g (5oz) soft light brown sugar
75g (3oz) butter
25cm (10in) diameter cake tin with 6cm (2½in) sides
Preheat the oven to 170°C (325°F), Gas mark 3, then grease the sides of the cake tin with sunflower oil and line the base with a disc of baking parchment.
Sift the plain flour, cinnamon, baking powder, bicarbonate of soda and salt into a large bowl, then add the wholemeal flour and sugar and mix together.
In a separate bowl, whisk together the sunflower oil, eggs and milk, then tip these into the flour and whisk until you have a smooth batter, and stir in the apples and walnuts. Pour the mixture into the prepared tin and bake for 55 minutes or until a skewer inserted into the centre of the cake comes out clean.
About 5 minutes before the cake is due to come out, make the glaze. Put the sugar, butter and 1 tablespoon of water into a saucepan and place over a medium heat. Stir until the sugar has dissolved, then remove from the heat.
When the cake is cooked, take it out of the oven and let it sit in the tin for 10 minutes. Using a small, sharp knife, loosen around the edges and carefully remove the cake from the tin before transferring to a serving plate.
Reheat the glaze and brush all over the cake, then allow to cool before serving. The glaze means this cake will keep for up to a week in an airtight container.

Bakewell cake
The Derbyshire town of Bakewell is responsible for the invention of the classic tart to which the town gave its name. The divine combination of raspberries and almonds makes for a gorgeous recipe – its inventor must have been someone who baked very well indeed! This cake is an evolution of the idea, using fresh or frozen raspberries rather than raspberry jam. It’s a simple recipe but a perfect example of how a simple combination of flavours can be deliciously effective.
Prep time: 15 minutes
Baking time: 50–55 minutes
Ready in: 1 hour 45 minutes
Serves: 6–8
150g (5oz) butter, softened, plus extra for greasing
150g (5oz) caster sugar
2 eggs
A few drops (not more than ⅛ tsp) of almond essence or extract
50ml (2fl oz) milk
150g (5oz) self-raising flour, sifted
150g (5oz) ground almonds
150g (5oz) fresh or frozen (and defrosted) raspberries
25g (1oz) flaked almonds
Icing sugar, for dusting
Softly whipped cream and fresh raspberries, to decorate
20cm (8in) diameter cake tin with 6cm (2½in) sides
Preheat the oven to 180°C (350°F), Gas mark 4, then butter the sides of the cake tin and line the base with a disc of baking parchment.
Cream the butter until soft in a large bowl or in an electric food mixer. Add the sugar and beat until the mixture is light and fluffy.
Whisk the eggs and the almond essence or extract together in a small bowl for a few seconds or just until combined, then gradually add the eggs to the creamed butter mixture, beating all the time. Next beat in the milk, then add the flour and ground almonds, carefully folding these in just until they are mixed.
Next add the raspberries and fold in gently so as not to break them up too much. Tip the batter into the prepared tin, then scatter over the flaked almonds. Bake for 50–55 minutes or until a skewer inserted into the centre of the cake comes out clean.
Remove from the oven and allow to cool in the tin for 10 minutes. Use a small, sharp knife to loosen the edges, then carefully remove the cake from the tin and leave on a wire rack to cool down completely before transferring to a serving plate.
Dust with icing sugar. Serve with softly whipped cream if you wish, or decorate with fresh raspberries.


Marbled chocolate crumble cake
I adore marbled cakes – they look so special with the different colours of sponge swirling into each other. In this recipe the crumble topping adds a contrasting crunch as well as an extra hit of chocolate. Serve on its own or after dinner with some softly whipped cream or crème fraîche.
Prep time: 25 minutes
Baking time: 50–60 minutes
Ready in: 2 hours
Serves: 6–8
225g (8oz) butter, softened, plus extra for greasing
225g (8oz) caster sugar
4 eggs
1 tsp vanilla extract
225g (8oz) plain flour
2 tsp baking powder
50ml (2fl oz) milk
25g (1oz) cocoa powder
Icing sugar, for dusting
For the crumble topping
125g (4½oz) plain flour, sifted
75g (3oz) caster sugar
75g (3oz) unsalted butter, chilled and cut into cubes
75g (3oz) dark or milk chocolate, in chips or roughly chopped into pieces
23cm (9in) diameter spring-form or loose-bottomed cake tin with 6cm (2½in) sides
First make the crumble topping. Using your fingertips, rub together the flour, sugar and butter in a large bowl until it resembles thick breadcrumbs, then mix in the chocolate pieces. Set aside in the fridge while you make the sponge.
Preheat the oven to 180°C (350°F), Gas mark 4, and butter the sides and the base of the cake tin. If you’re using a spring-form tin, make sure the base is upside down so there’s no lip and the cake can slide off easily when cooked. Cream the butter until soft in a large bowl or in an electric food mixer. Add the sugar and beat until the mixture is light and fluffy.
Whisk the eggs and vanilla extract together in a small bowl for a few seconds or just until combined, then gradually add the eggs to the creamed butter and sugar mixture, beating all the time. Sift in the flour and baking powder and fold in carefully, then add the milk and mix gently to combine. Tip half of the cake mixture into another large bowl, then sift the cocoa powder into this bowl and fold it in.


