 полная версия
A Little Preserving Book for a Little Girl
"But I shan't tell him," laughed Adelaide.
"I'll put them away and then surprise him next winter; perhaps I'll give him a jar for a Christmas present."
So Adelaide smiled away to herself as she busily prepared the vegetables.
The tiny cucumbers were washed and wiped carefully and placed in a large earthenware bowl. The cauliflower was placed in a pan of cold water to which had been added a handful of salt (this was to draw out any insects or little worms that might be there), it was pulled apart into small flowers, cutting off the thick stalk, then added to the cucumbers. The celery was thoroughly washed, the leaves and tough outside stalks removed, the sticks cut into small pieces about an inch long and added to the cucumbers and cauliflower. The red and green peppers were washed and wiped and the seeds removed, then Adelaide put them through the meat chopper and used the seeds of one-eighth of one pepper. These were placed in the bowl and mixed with the other vegetables.
Over the little button onions or silver skins, Adelaide poured boiling water, then removed the skins under running water (to prevent her from crying) and poured them into the bowl.
After a brine of two and one-half quarts of cold water and a cup and a quarter of salt was made, it was poured over the vegetables and stood over night.
In the morning the vegetables were well drained in the colander and one and three-fourths quarts of vinegar was brought to the boiling point.
Adding the pickles, Adelaide let them cook until they were perfectly tender, next she added one and one-fourth cups of sugar and two teaspoons of celery seed.
Mixing together one-fourth of a pound of English mustard, one-fourth of an ounce of turmeric powder and three-eighths of a cup of flour with one cup of vinegar (added gradually so that it made a smooth paste) Adelaide poured this over the pickles and stirred with the wooden spoon until it just thickened.
The sterilized jars were filled at once to overflowing, the silver knife inserted to let all air bubbles rise to the top and break, and the new rubbers fitted on smoothly. Sealing them quickly, Adelaide stood the jars upside down out of the way of any draft.
The next morning, after carefully inspecting each jar to see that it did not leak, she wiped off the outsides with a damp cloth, pasted on the labels and stored away in the preserve closet.
Ripe Cucumber Pickles
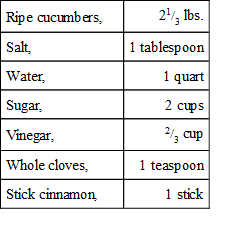
Adelaide washed and wiped the cucumbers, cut them in quarters lengthwise and each quarter in halves. These she weighed, then placed in an earthenware bowl and covered with a weak brine made of one quart of cold water and one tablespoon of salt.
After allowing them to stand for twelve hours, she rinsed the cucumbers thoroughly in several waters, then steamed them for twenty minutes. Putting the two-thirds of a cup of vinegar, the two cups of sugar, the teaspoon of whole cloves and the stick of cinnamon (broken in small pieces) into a saucepan, Adelaide boiled them for five minutes; adding the cucumbers she let them simmer for twenty minutes.
Removing the saucepan, she covered it and stood it away until the next day, when she lifted out the cucumbers with a silver fork and placed them in the sterilized pint jars. The syrup she boiled for five minutes, then poured at once into the jars so that it overflowed. Next she inserted the silver knife to let all air bubbles rise to the top and break, fitted on the new rubbers smoothly, sealed quickly and stood upside down out of the way of any draft.
In the morning the jars were inspected carefully to see that they did not leak, the outsides were wiped clean with a damp cloth, the labels were pasted on and then Adelaide stored the jars away in the preserve closet.
Chopped Pickles
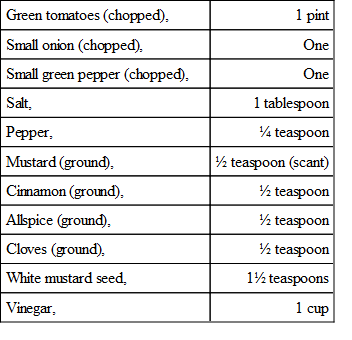
After washing and wiping the tomatoes, and peeling the onion, Adelaide put them through the meat chopper. The green pepper was also washed and wiped and put through the meat chopper when she had removed the seeds.
Placing these in an earthenware bowl, Adelaide sprinkled a tablespoon of salt over them, covered them, stood them aside for twenty-four hours and then drained them.
The cup of vinegar, the one-fourth teaspoon of pepper, the scant half teaspoon of ground mustard, the one-half teaspoon each of ground cinnamon, allspice, and cloves, and the one and one-half teaspoons of white mustard seed were placed in a saucepan and heated to the boiling point, after which Adelaide added the tomatoes, onion, and pepper, cooking them slowly for fifteen minutes.
She next filled the sterilized pint jar to overflowing, inserted a silver knife to let all air bubbles rise to the top and break, fitted a new rubber on smoothly, sealed the jar quickly and stood it upside down out of the way of any draft.
In the morning Adelaide examined the jar carefully to be sure that it did not leak, wiped the outside with a damp cloth, pasted on the label and stored the jar away in the preserve closet.
Chow Chow
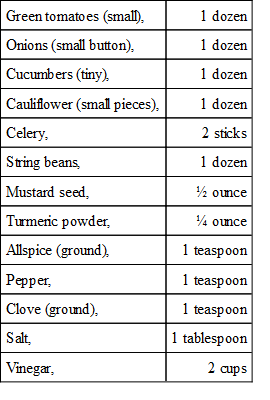
When Adelaide had washed and wiped the tomatoes she cut them into quarters.
The small button onions she peeled under running water. The tiny cucumbers were washed and wiped, then cut in halves. The cauliflower was placed in a pan of cold water. She added one tablespoon of salt (this drew out any insects or small worms that might be there), then she broke off twelve small pieces. The two white stalks of celery she washed and cut into inch pieces. The string beans were washed, wiped, the strings removed and each bean cut into small pieces.
All these Adelaide placed in a large earthenware bowl and sprinkled a tablespoon of salt over the vegetables, letting them stand over night, then draining them.
The one-half ounce of mustard seed, the one-fourth ounce of turmeric powder, the teaspoon each of allspice, pepper, and clove and the two cups of vinegar Adelaide put in the saucepan and brought to the boiling point. After which, she added the vegetables and cooked until tender.
The sterilized pint jars were filled to overflowing, the silver knife inserted to let all air bubbles rise to the top and break, the new rubbers were fitted on smoothly, and the jars sealed quickly. Then Adelaide stood them upside down out of the way of any draft.
In the morning Adelaide examined the jars to be sure that they did not leak, wiped off the outsides with a damp cloth, pasted on the labels and stored her work away in the preserve closet.
Pickled Red Cabbage
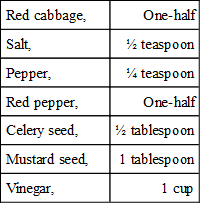
Adelaide stood the cabbage in a pan of cold water containing one tablespoon of salt. This was to draw out any insects or worms that are sometimes found among the leaves. After draining the cabbage she cut it into fine strips.
The red pepper she wiped, removed the seed, and cut into small pieces. This with the one-half tablespoon of celery seed, the tablespoon of mustard seed, the one-half teaspoon of salt, the one-fourth teaspoon of pepper, and the cup of vinegar Adelaide put into a saucepan and brought to the boiling point.
Packing the cabbage into a sterilized jar, Adelaide poured over the vinegar, mustard and celery seeds as soon as they were cold.
The air bubbles were forced to the top and broken by inserting a silver knife in the jar, a new rubber was fitted on, then Adelaide sealed the jar quickly and stood it upside down over night.
Next morning, after examining it carefully to see that it did not leak, she wiped the jar on the outside with a damp cloth, pasted on the label and stored the pickled cabbage away in the preserve closet.
Cucumber Pickles
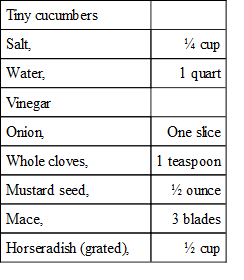
Adelaide measured enough of the tiny cucumbers to fill a pint jar, washed and wiped them, then placed them in an earthenware bowl. These she covered with one quart of water and one-fourth of a cup of salt and let them stand twenty-four hours.
At the end of this time Adelaide took out the cucumbers, wiped each one, and placed them in the sterilized pint jar. Measuring enough vinegar to fill the jar, Adelaide poured it into a saucepan, then added one slice of onion, a teaspoon of whole cloves, one-half ounce of mustard seed, three blades of mace and one-half cup of grated horseradish.
As soon as the vinegar boiled Adelaide poured it over the cucumbers at once. Next she inserted a silver knife in the jar to force all air bubbles to the top, fitted on a new rubber, sealed quickly, then stood the jar upside down over night.
In the morning the jar was carefully inspected to be sure it did not leak, the outside was wiped off with a damp cloth, then Adelaide pasted on the label and stored the outcome of her work away in the preserve closet.
Plum Tomato Pickles
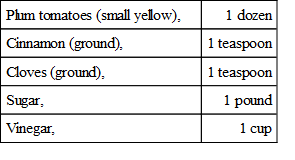
First Adelaide measured out the cup of vinegar, the pound of sugar and the teaspoon each of cloves and cinnamon into a saucepan. While these were boiling for five minutes, Adelaide washed and wiped the tomatoes.
Dropping them carefully into the syrup, Adelaide let the tomatoes simmer gently until they could be pierced easily with a silver fork. Taking care not to break the fruit, she lifted the tomatoes into the sterilized jar and poured on the syrup to overflowing. After inserting a silver knife between the jar and the fruit to let all air bubbles rise to the top and break, Adelaide fitted on a new rubber smoothly, sealed the jar quickly and stood it upside down out of the way of any draft.
The next morning she inspected the jar carefully to be sure it did not leak, wiped off the outside with a damp cloth, pasted on the label and stored the jar away in the preserve closet.
Tomato Catsup
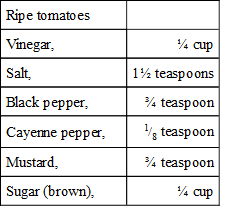
Adelaide placed several large tomatoes in a pan and covered them with boiling water. It was then easy, she found, to remove the skins. After cutting them into quarters, she put the tomatoes into a saucepan and let them just come to the boiling point. Removing the saucepan from the fire, Adelaide poured the tomatoes into the colander, pressed them through, and then pressed them again through a sieve.
To one pint of pressed tomatoes Adelaide added one-fourth of a cup of vinegar, one and one-half teaspoons of salt, three-fourths of a teaspoon of black pepper, one-eighth of a teaspoon of cayenne pepper, three-fourths of a teaspoon of dry mustard, and one-fourth of a cup of brown sugar.
Adelaide boiled these ingredients together until they thickened, then poured them into bottles. She filled the bottles clear to the top allowing just enough room for the cork, which she pressed in tightly, then dipped the top of the bottle into melted paraffin. After putting on the label, Adelaide stored the jar away in the preserve closet.
"Mother," said Adelaide one morning, "how do you put up tomatoes? I mean ones like those you use for tomato bisque and scalloped tomatoes?"
"There is nothing simpler, my dear, and as soon as those big beauties on Daddy's tomato plants are ripe enough you shall have them for your own," answered mother.
Tomatoes

Adelaide watched those tomatoes every day, and as soon as they were sufficiently ripe she picked them.
Placing the tomatoes in a pan, she covered them with boiling water for about a minute, drained off the water, peeled them and cut them into quarters. Adelaide let these come just to the boiling point, then she filled the sterilized pint jars at once. In filling the jars Adelaide was careful not to let any of the little seeds of the tomatoes remain on the rubber as they might prevent the jar from being perfectly air-tight.
As usual, Adelaide inserted the silver knife in the jar to let all air bubbles rise to the top and break, fitted on new rubbers smoothly, sealed the jar quickly and let it stand upside down out of the way of any draft.
The next morning Adelaide examined the jar thoroughly to be sure it did not leak, wiped off the outside with a damp cloth, pasted on the label, then stored the jar away in the preserve closet.
CHAPTER VIII
CANNING THE GOVERNMENT WAY
Early in the summer a friend who was doing government extension work in one of our New England states sent Adelaide a book on "Home Canning" that the government had published.
Adelaide was much pleased and she and mother pored over it eagerly. Mother picked out the "Single Period Cold-Pack" method as being the simplest and best for a little girl.
This is what the government says—
"By the 'Single Period Cold-Pack' method it is as easy to can vegetables as to can fruits. The prepared vegetables or fruits are blanched in boiling water or live steam, then quickly cold-dipped and packed at once into hot jars and sterilized in boiling water or by steam pressure. The jars are then sealed, tested for leaks and stored."
The Single Period Cold-Pack method is a simple and sure way of canning. It insures a good color, texture and flavor to the vegetable or fruit canned. In using this method sterilization is completed in a single period, saving time, fuel and labor. The simplicity of the method commends it. Fruits are put up in syrups. Vegetables require only salt for flavoring and water to fill the container.
Another advantage is that it is practicable to put up food in small as well as large quantities.
Single Period Cold-Pack Equipment
The Homemade Outfit.—A serviceable Single Period Cold-Pack canning outfit may be made of equipment found in almost any household. Any utensil large and deep enough to allow an inch of water above jars, and having a closely fitting cover, may be used for sterilizing. Into this utensil should be placed a wire or wooden rack to hold the jars off the bottom and to permit circulation of water underneath the jars. For lifting glass top jars use two buttonhooks or a similar device. For lifting screw-top jars, suitable lifters may be bought for a small sum.
Containers
For home use glass jars are more satisfactory for canning. Glass jars properly cared for will last for years. All types of jars which seal readily may be used. Jars having glass tops held in place by bails are especially easy to handle while they are hot.
Tops for Economy jars must be purchased new each year.
Small necked bottles can be used for holding fruit juices. Large mouthed bottles can be used for jams, marmalades and jellies.
Tests for Jars and Rubbers
Jars should be tested before they are used. Some of the important tests are here given:
Glass-top Jars.—Fit top to jar. If top rocks when tapped it should not be used on that jar. The top bail should not be too tight nor too loose. If either too tight or too loose the bail should be taken off and bent until it goes into place with a light snap. All sharp edges on top and jar should be filed or scraped off.
Screw-top Jars.—Use only enameled, lacquered or vulcanized tops. Screw the top on tightly without the rubber. If thumb nail can be inserted between top and jar, the top is defective. If the edge is only slightly uneven it can be bent so that it is usable. Put on the rubber and screw on the top tightly, and then pull the rubber out. If the rubber returns to place the top does not fit properly and should not be used on that jar.
Rubbers.—Be very particular about the rubbers used. Buy new rubbers every year as they deteriorate from one season to another. It is always well to test rubbers when buying. A good rubber will return to its original size when stretched. When pinched it does not crease. It should fit the neck of the jar snugly, and be fairly wide and thick. It is cheaper to discard a doubtful rubber than to lose a jar of canned goods.
Grading
Vegetables and fruits should be sorted according to color, size and ripeness. This is called grading. It insures the best pack and uniformity of flavor and texture to the canned product, which is always desirable.
Blanching and Cold-Dipping
The most important steps in canning are the preliminary steps of blanching, cold-dipping, packing in hot, clean containers, adding hot water at once, then immediately half sealing jars and putting into the sterilizer. Spoilage of products is nearly always due to carelessness in one of these steps. Blanching is necessary with all vegetables and many fruits. It insures thorough cleansing and removes objectionable odors and flavors and excess acids. It reduces the bulk of greens and causes shrinkage of fruits, increasing the quantity which may be packed in a container, which saves storage space.
Blanching consists of plunging the vegetables or fruits into boiling water for a short time. For doing this place them in a wire basket or piece of cheesecloth. The blanching time varies from one to fifteen minutes, as shown in the time-table.
Spinach and other greens should not be blanched in hot water. They must be blanched in steam. To do this place them in a colander and set this into a vessel which has a tightly fitting cover. In this vessel there should be an inch or two of water, but the water must not be allowed to touch the greens. Another method is to suspend the greens in the closed vessel above an inch or two of water. This may be done in a wire basket or in cheesecloth. Allow the water to boil in the closed vessel from fifteen to twenty minutes.
When the blanching is complete remove the vegetables or fruits from the boiling water or steam and plunge them once or twice into cold water. Do not allow them to stand in the cold water. This latter process is the Cold Dip. It hardens the pulp and sets the coloring matter in the product.
Steps in the Single Period Cold-Pack Method
In canning by the Single Period Cold-Pack method it is important that careful attention be given to each detail. Do not undertake canning until you have familiarized yourself with the various steps, which are as follows:
1. Vegetables should be canned as soon as possible after being picked; the same day is best. Early morning is the best time for gathering them. Fruits should be as fresh as possible.
2. Before starting work have on the stove the boiler or other holder in which the sterilizing is to be done, a pan of boiling water for use in blanching and a kettle of boiling water for use in filling jars of vegetables; or, if canning fruits, the syrup to be used in filling the jars. Arrange on this working table all necessary equipment, including instructions.
3. Test jars and tops. All jars, rubbers and tops should be clean and hot.
4. Wash and grade product according to size and ripeness. (Cauliflower should be soaked 1 hour in salted water, to remove insects if any are present. Put berries into a colander and wash, by allowing cold water to flow over them, to prevent bruising.)
5. Prepare vegetable or fruit. Remove all but an inch of the tops from beets, parsnips and carrots and the strings from green beans. Pare squash, remove seeds and cut in small pieces. Large vegetables should be cut into pieces to make close pack possible. The pits should be removed from cherries, peaches and apricots.
6. Blanch in boiling water or steam as directed.
7. Cold-dip, but do not allow product to stand in cold water at this or any other stage.
8. Pack in hot jars which rest on hot cloths or stand in a pan of hot water. Fill the jars to within ¼ to ½ inch of tops. (In canning berries, to insure a close pack, put a 2 or 3 inch layer of berries on the bottom of the jar and press down gently with a wooden spoon. Continue in this manner with other layers until jar is filled. Fruits cut in half should be arranged with pit surface down.)
9. Add salt and boiling water to vegetables to cover them. To fruits add hot syrup or water.
10. Place wet rubber and top on jar.
11. With a bail-top jar adjust top bail only, leaving lower bail or snap, free. With screw top jar screw the top on lightly, using only the thumb and little finger. (This partial sealing makes it possible for steam generated within the jar to escape, and prevents breakage.)
12. Place the jars on rack in boiler or other sterilizer. If the home-made hot-water bath outfit is used enough water should be in the boiler to come at least one inch above the tops of the jars, and the water, in boiling out, should never be allowed to drop to the level of these tops. In using the hot-water bath outfit, begin to count sterilizing time when the water begins to boil. Water is at the boiling point when it is jumping or rolling all over. Water is not boiling when bubbles merely form on the bottom or when they begin to rise to the top. The water must be kept boiling all during the period of sterilization.
13. Consult time table and at the end of the required sterilizing period remove the jars from the sterilizer. Place them on a wooden rack or on several thicknesses of cloth to prevent breakage. Complete the sealing of jars. With bail-top jars this is done by pushing the snap down; with screw-top jars by screwing cover on tightly.
14. Turn the jars upside down as a test for leakage and leave them in this position till cold. Let them cool rapidly but be sure that no draft reaches them as a draft will cause breakage. (If there is any doubt that a bail-top jar is perfectly sealed a simple test may be made by loosening the top bail and lifting the jar by taking hold of the top with the fingers. The internal suction should hold the top tightly in place when thus lifted. If the top comes off put on a new wet rubber and sterilize 15 minutes longer for fruits.) With screw-top jars try the tops while the jars are cooling, or as soon as they have cooled, and, if loose, tighten them by screwing on more closely.
15. Wash and dry each jar, label and store. If storage place is exposed to light, wrap each jar in paper, preferably brown, as light will fade the color of products canned in glass. The boxes in which jars were bought affords a good storage place.
Caution Against Freezing
Care should be taken to store canned vegetables and fruits where they will be protected from freezing. If the place of storage is not frost-proof the jars should be moved to a warmer place when the weather becomes severe.
Time Table for Blanching and Sterilizing
The following time table shows blanching time for various vegetables and fruits, and also sterilizing time.

1 Some peaches do not peel readily even if dipped in boiling water. In such cases omit dipping in boiling water and pare them.
The time given in this table and in the special instructions is for quart jars. For pint jars deduct 5 minutes. For 2 quart jars add 30 minutes.
The time here given is for 1 quart jars and fresh products at altitudes up to 1,000 feet above sea level. For higher altitudes increase the time 10 per cent for each additional 500 feet. For example, if the time is given as 120 minutes in the table and your location is 1,500 feet above sea level, the time should be made 132 minutes; for 2,000 feet, 144 minutes.
The time here given is for fresh, sound and firm vegetables. For vegetables which have been gathered over 24 hours increase the time of sterilization by adding one-fifth.


