
Полная версия
Recipes from My Mother


Copyright

HarperCollinsPublishers
1 London Bridge Street
London SE1 9GF
www.harpercollins.co.uk
First published by HarperCollinsPublishers 2017
FIRST EDITION
Text © Rachel Allen 2017
Photography © Maja Smend 2017
Cover layout design © HarperCollinsPublishers 2017
Food styling: Annie Rigg
Prop styling: Lydia Brun
A catalogue record of this book is available from the British Library
Rachel Allen asserts the moral right to be identified as the author of this work
All rights reserved under International and Pan-American Copyright Conventions. By payment of the required fees, you have been granted the nonexclusive, non-transferable right to access and read the text of this e-book on screen. No part of this text may be reproduced, transmitted, downloaded, decompiled, reverse engineered, or stored in or introduced into any information storage retrieval system, in any form or by any means, whether electronic or mechanical, now known or hereinafter invented, without the express written permission of HarperCollins e-books.
Find out about HarperCollins and the environment at www.harpercollins.co.uk/green
Source ISBN 9780008208172
Ebook Edition © February 2017 ISBN: 9780008179809
Version 2017-01-24
HarperCollinsPublishers has made every reasonable effort to ensure that any picture content and written content in this ebook has been included or removed in accordance with the contractual and technological constraints in operation at the time of publication.
Dedication
This book is dedicated to the two mothers in my life. To my mum Hallfridur, who is loving and wise in every situation, and has given me the best start in life. And to my dynamic, indefatigable mother-in-law Darina, who has dedicated her life to teaching and inspiring future generations to feed themselves and others in the best possible way. Thank you both.

Contents
Cover
Title Page
Copyright
Dedication
Introduction
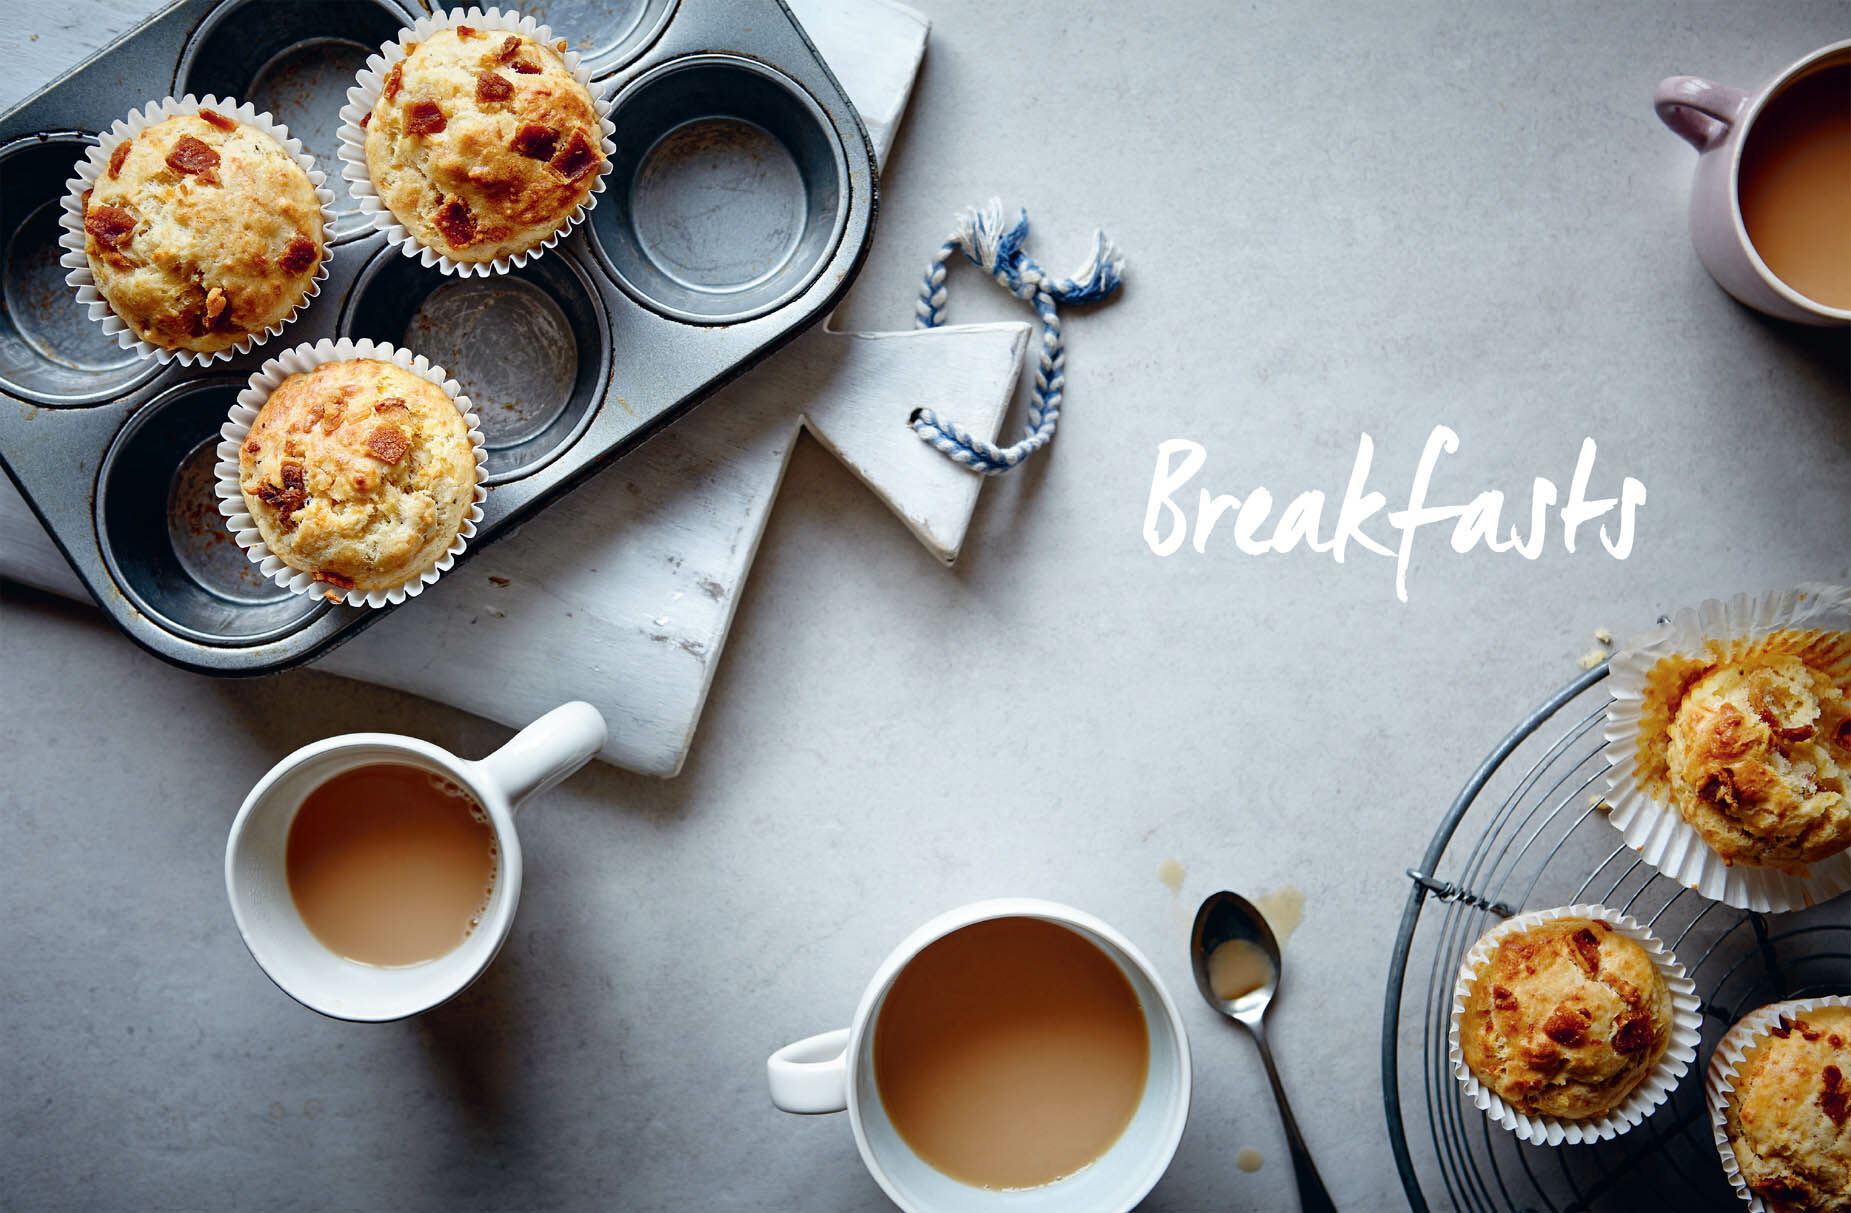
Breakfasts
Lunches
Dinners
Desserts
Baking
Preserving
List of Searchable Terms
List of Recipes
Acknowledgements
Also by Rachel Allen
About the Publisher

Introduction
I’ve always been fascinated by what makes people the way they are. We are like very complex, colourful tapestries, and as with every other living being, no two of us are exactly the same. We are all, of course, a product of two different people, but who we are as actual individuals goes deeper and is much more interesting than that. The place where we grew up, the climate, the cultures, the traditions and, not least, the food we eat all play a part in weaving together the fibres that make us who we are.
I grew up in Dublin with a sister, an Irish father and a mother from Iceland. I’ve always been very proud of my half-Icelandic and half-Irish heritage. I count myself fortunate in that it was a very happy home with lots of good food. While my father made great brown bread and the best poached eggs in town, it was my mum who always cooked a delicious and nutritious meal for us all to eat at the end of the day. She had first one, then two, busy boutiques (while even whipping up the clothes for the shop herself on the sewing machine in the 1970s) and somehow there was always a great meal ready for us in the evening.
My favourites were the kinds of dishes that many people call comfort food – roast chicken, stews and casseroles – for which there is rarely a traditional Irish recipe as every family has their own. Despite only arriving in Dublin when she was 19, my mother seemed to quickly master the Irish flavours and cooking techniques. Recipes such as St Patrick’s Day Bacon with Parsley Sauce and Cabbage Purée and Irish Stew with Pearl Barley were a regular feature of my childhood. Looking back on it now, I am so appreciative of the fact that I got to sit down at the table to enjoy these meals with my family and catch up on what had happened during the day. It’s the one thing that my husband, Isaac, and I insist on now with our children – for me it’s one of the most important times of the day.
I’m also very appreciative of the fact that as a child, family holidays often took us abroad. By visiting different countries, I was introduced to a wealth of different foods and flavours. So it felt right to include a few dishes inspired by these memories – Mussels with Tomato, Chorizo, Sherry and Parsley, for example, and Tomato Risotto with Lemon and Basil Mascarpone.
Although my mother has lived in Dublin since marrying my father, she grew up in Iceland. Life in Reykjavik in the 1940s was, of course, very different from what it is now. Mum and her family lived close to the docks, which was where they would go to get their just-caught fish and also smoked fish, which was prepared as soon as it came in from the boats and was very popular because nobody had fridges. Being an island nation with not a huge amount of vegetation, fish featured a lot in their diet, much more so than meat, though if there was meat it was lamb. Even with a mainly fish diet, my mum remembers that children were all given cod liver oil in school every day as a supplement!
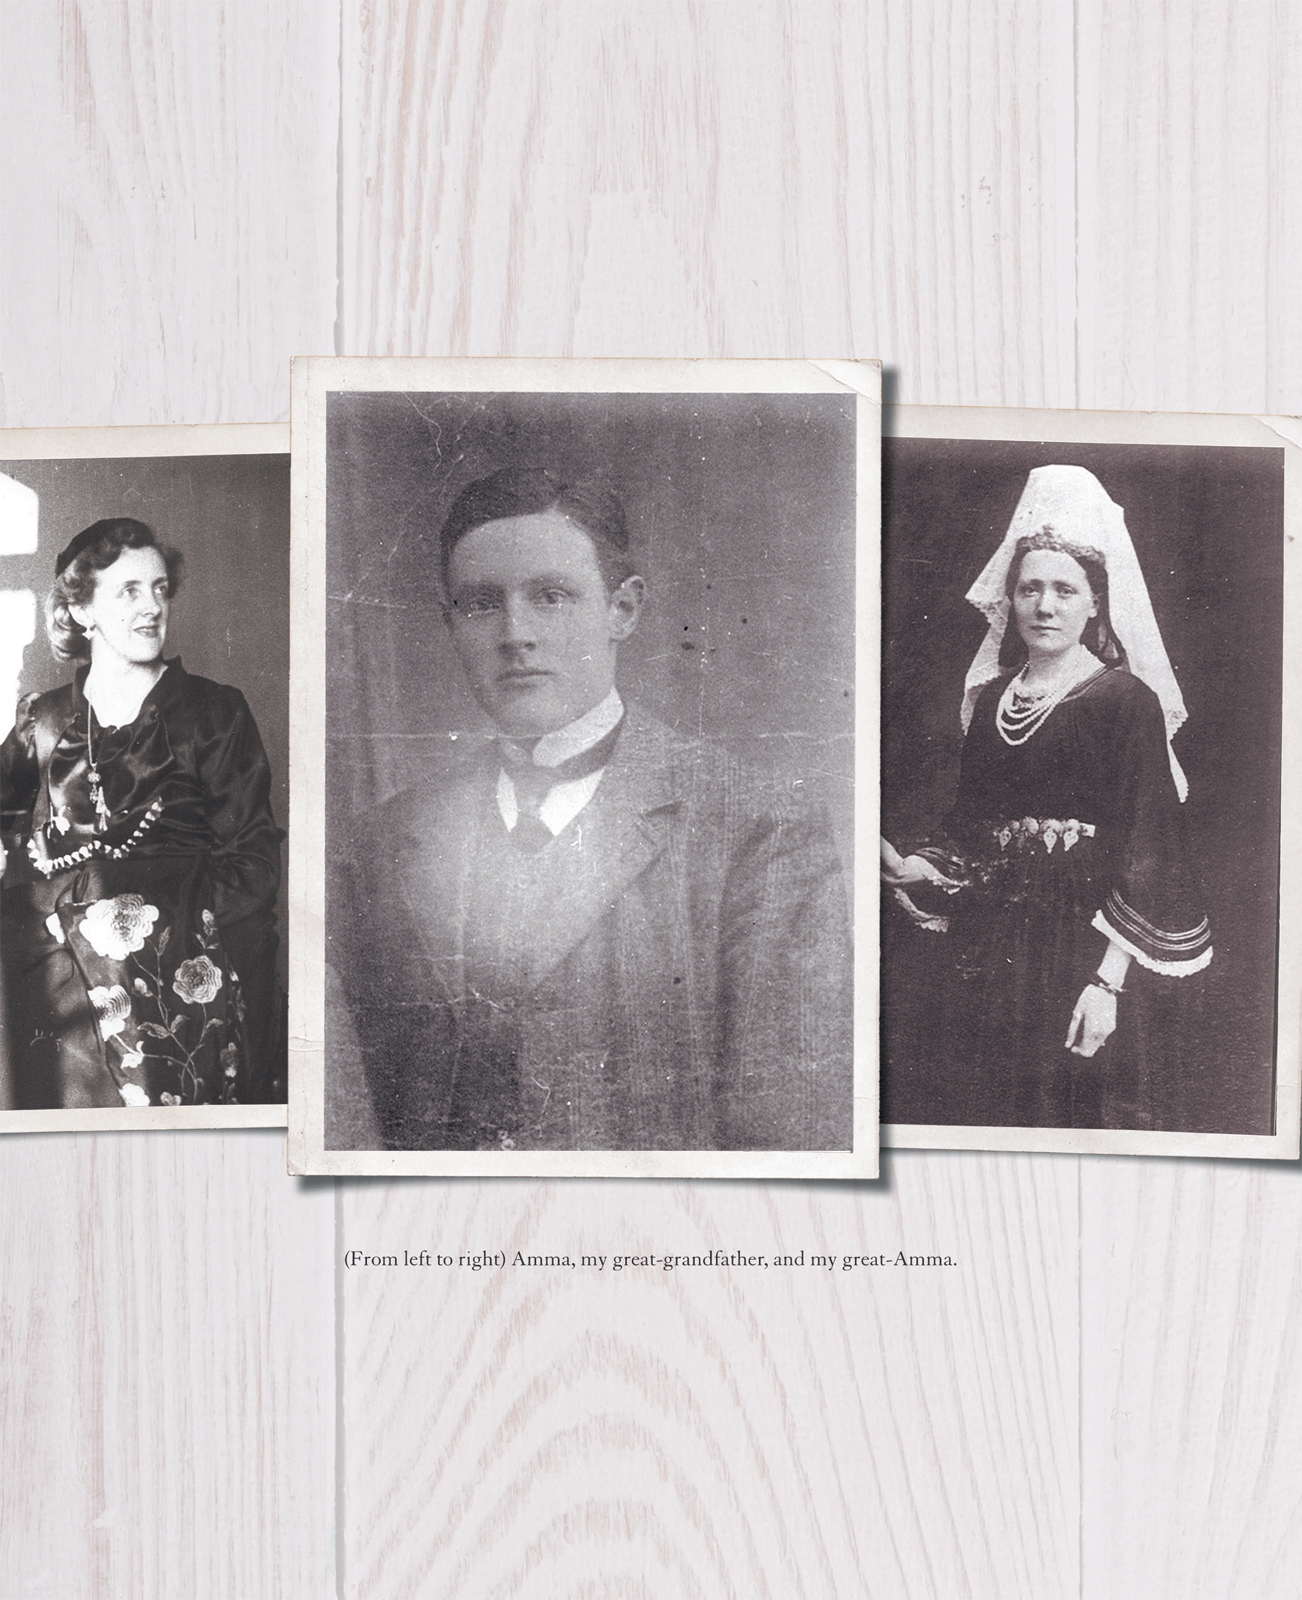
One of my favourite Icelandic foods that Mum often used to eat and we enjoyed on holidays in Iceland is harðfiskur – the salted dried fish. I can still remember we used to eat it cold, spread with salted butter, as did Mum when she was young. It’s still really popular there and although it’s more often eaten as a snack, it is sometimes heated in soups and stews. I tried to make it recently at home in County Cork, but it just didn’t match up to the authentic Icelandic version, which is dried in the North Atlantic sea breeze. I guess I’ll just have to wait for my next trip to Iceland until I have some more. Breakfast for my mum before she would skate across the Tjörnin lake in the middle of Reykjavik to get to school in wintertime was a bowl of sfyr, which is a bit like a Greek yoghurt, but is technically a cheese (as described on here). Mum remembers it being incredibly thick in the tub, so it would be thinned out with milk. In the wintertime it was scattered with cinnamon sugar and during the long, bright summers, they would enjoy it with berries. These were mainly blueberries that they’d picked at the weekend when visiting their relatives in the countryside, where they would also go camping, ride ponies and, in the wintertime, ski. The dairy where they used to buy skyr was next door to the bakery where my mum’s favourite treat of all came from – vinabroð. These are gorgeous little delicacies made with puff pastry and an almond or custard topping, and Mum still remembers how they were always wrapped in baking parchment for her and her little sister to bring back home. One of the most popular Icelandic pastries still is kleinur, but Mum remembers these were more often than not made at home, as being deep-fried they need to be eaten as soon as they’re made. My amma (Icelandic for grandmother – my mum’s mum) used to make these for Grandpa, as he adored them, like my children do now. Unfortunately I never got Amma’s kleinur recipe from her, but my version, which is hopefully does justice to hers.


I get such pleasure when I see my children enjoying really good food, whether it’s fish that they’ve caught, filleted and cooked themselves, shrimps that my daughter learnt how to peel and demolish by the dozen from her great-grandmother, or the seeds that they’ve planted and watched turn into sweet, crunchy carrots or cucumbers. I hope that they’ll get the opportunity to teach and inspire future generations, passing on the appreciation and joy that there is to be had from great food.
As well as chatting to my own mum about the food that she loved as a child, I’ve been lucky enough to get wonderful stories and recipes from some of my friends, and indeed my mother-in-law Darina, about the food that was cooked for them by their mothers.
Thanks to all my friends who offered not only recipes but inspiration too: from Patricia for her tales of weekly liver with onions; Helen with her mother’s delicious apple cake recipe, which I’ve tweaked to feature plums; Nessa, whose mother Margaret lent me her precious three-generation-old handwritten cookbook; Fingal and his mum Giana for the wonderful stories and many emails; and Pam for the lovely tip of using breadcrumbs in a crumble like her mum Sheila did and still does. Thanks to Ted and his mum Charlotte for the delicious Swedish seed crackers recipe, to Lara for many wonderful stories about her childhood and her love of food in Iceland, and to Jasper, Tiffany and their mum Julia, who so generously gave me more wonderful recipes than I had space for.
I hope that you too enjoy the recipes in this book and feel inspired to pass them down to the next generation.

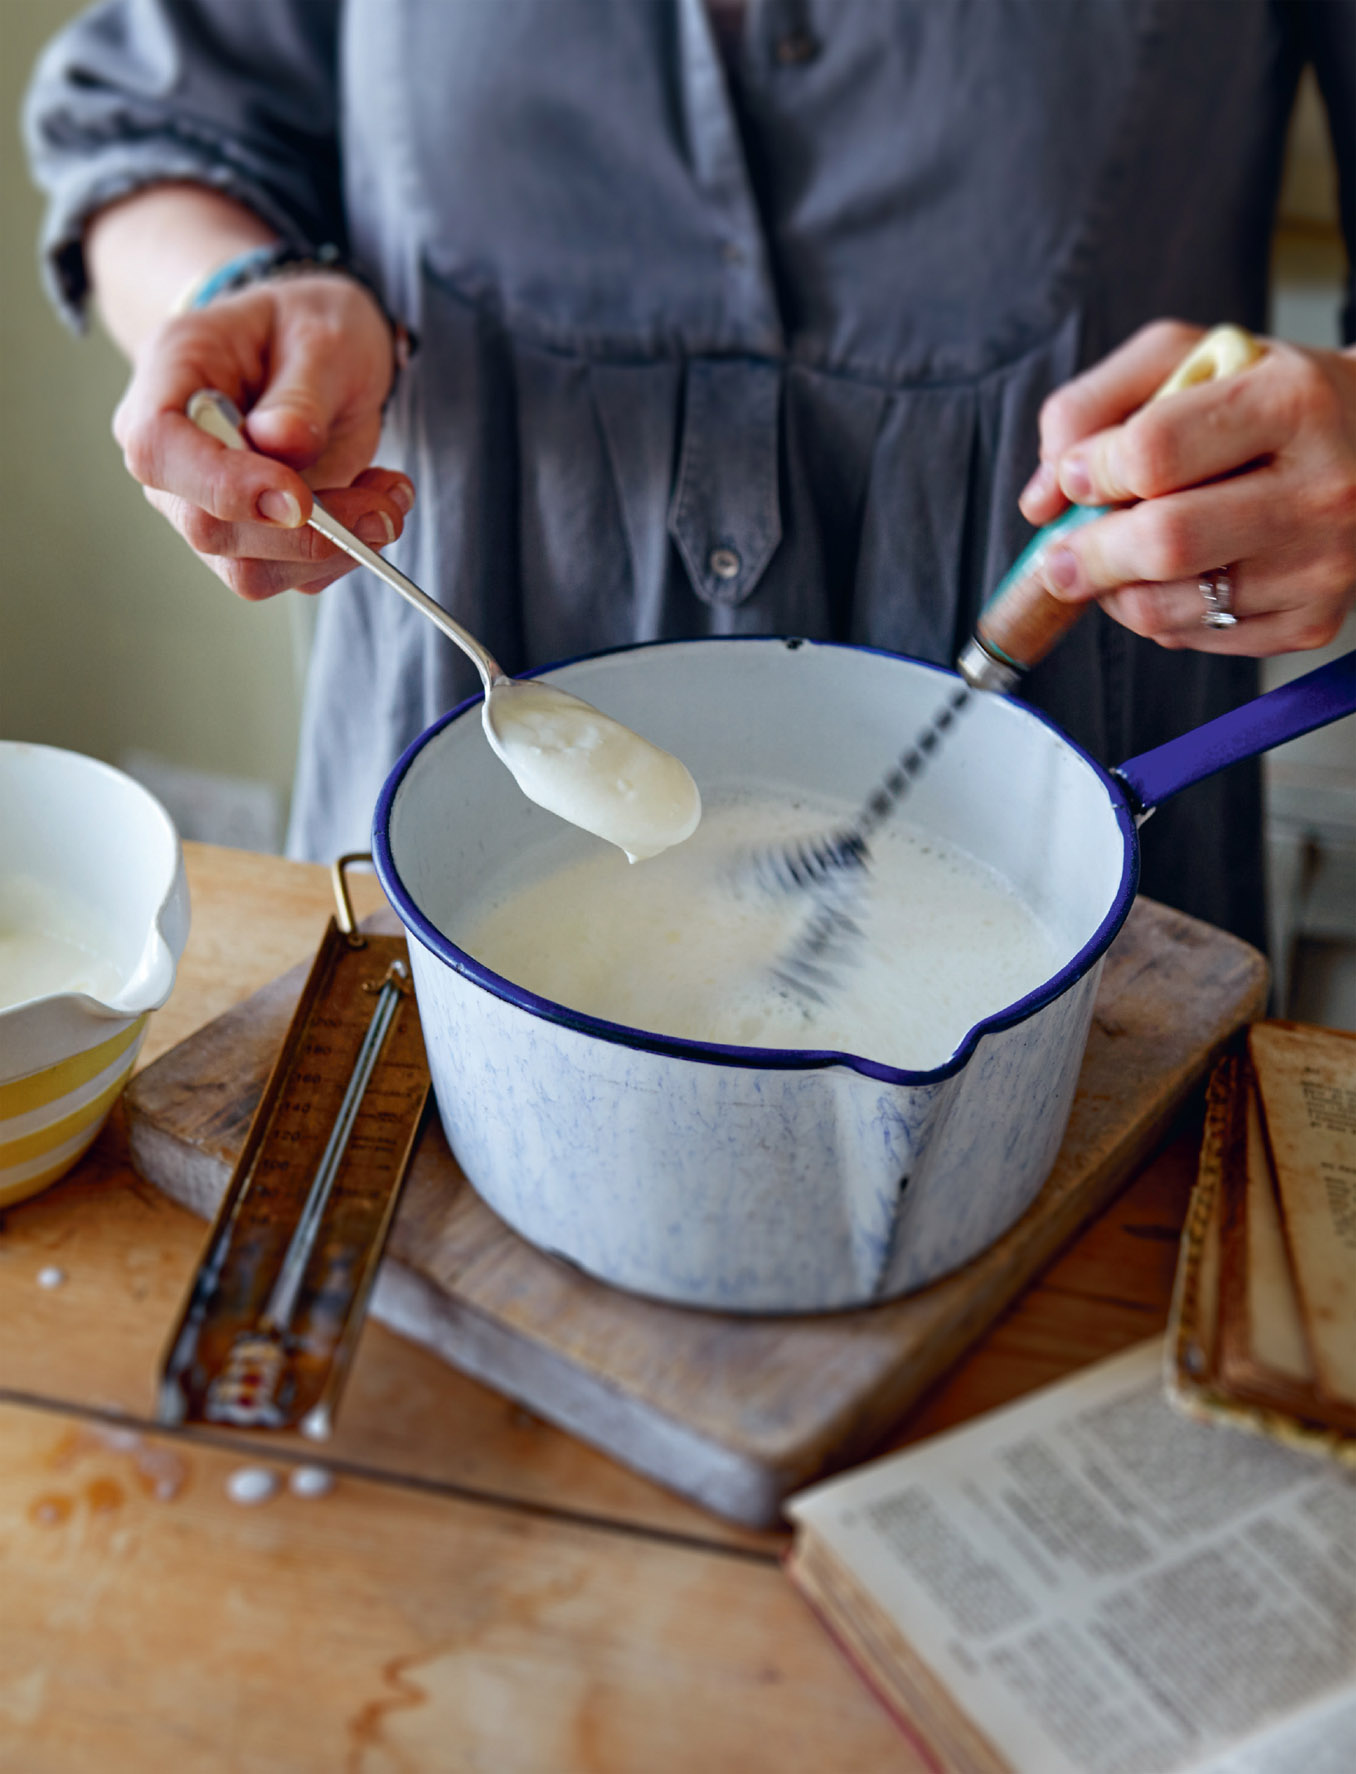
Skyr
MAKES ABOUT ¾ LITRE
Skyr is one of the Icelandic tastes of my childhood. Otherwise known as Icelandic curds, skyr is an age-old recipe dating back to the ninth century. It’s often compared to Greek yoghurt, but strictly speaking it is a cheese – thicker than yoghurt with a slight cheesy tang. It’s delicious, and is sometimes served with a little cream and brown sugar or, as I remember it, a splash of milk and a sprinkle of sugar. My sister and I used to have milk and sugar over natural yoghurt at home in Dublin to try to replicate the flavour. Making your own skyr is not unlike making yoghurt, although often a couple of drops of rennet are added and the ‘set’ milk is cut and strained to release the whey from the curds. Skyr can be left plain or flavoured with honey, coffee, vanilla and even herbs such as mint, rosemary and thyme. Homemade skyr will keep, covered, in the fridge for one week.
1 litre (1¾ pints) full-cream milk (I like to use an organic unpasteurised milk if possible, but other milk can be used)
1 tbsp skyr, from a previous batch if possible or shop bought (failing that, use a live active culture yoghurt)
2 drops of rennet or vegetable rennet (optional)
1. Place the milk in a saucepan over a very low heat and warm it slowly until it reaches 90°C (195°F). This should take 1 hour. Take it off the heat and set aside, at room temperature, to cool until it reaches 40°C (105°C) – 30 minutes. If this step is done too quickly, it could affect the setting of the skyr.
2. Add 1 tablespoon skyr (or yoghurt) and whisk to combine, making sure not to scrape the bottom of the pot. Next, stir in the rennet, if using. Place a lid on the saucepan and wrap it with two tea towels, then leave to stand at room temperature for 12–15 hours (a few more hours will probably be ok if you have to leave the house, but definitely not more than 24 hours).
3. By this stage, the milk should have thickened and you should notice the see-through whey separating from the brilliant white curds. Place a clean piece of muslin or cheesecloth in a sieve set over a bowl. Using a clean knife, cut the curds into a grid-shape, then tip into the lined sieve. Tie the material into a knot or tie with string, then hang the bundle from a hook or a wooden spoon stuck through the knot and suspend it over the bowl, removing the sieve. The fabric should not be touching the whey that’s dripping off it into the bowl. If your kitchen is quite warm, hang the skyr in the fridge.
4. Leave to hang for 2 hours or until the mixture in the bundle is quite thick and almost beginning to dry at the edges. If it’s too dry, whisk in some of the whey to thin it out. It should be thicker than Greek yoghurt, but not as thick as cream cheese. Once it’s thick enough, it can be eaten straight away or covered (flavoured or not) and placed in the fridge for up to a week. You can drink the nutrition-packed whey if you like.
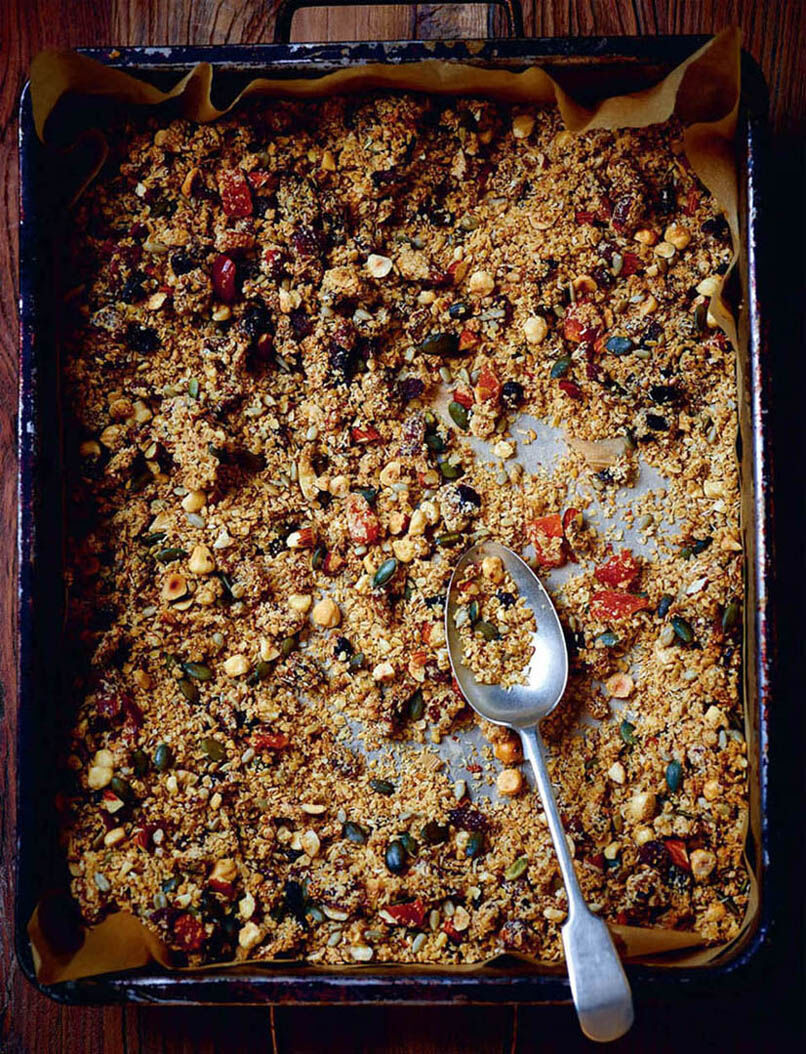
Crunchy granola
MAKES ABOUT 1.5KG (3LB 5OZ) GRANOLA
A deliciously crunchy, nutty start to the day. Make this recipe your own by adding your favourite seeds, nuts or dried fruit.
125g (4½oz) butter or coconut oil
150ml (5fl oz) honey or maple or agave syrup
1 tsp vanilla extract
500g (1lb 2oz) oat flakes
100g (3½oz) almonds (preferably with skin), coarsely chopped
100g (3½oz) chopped hazelnuts
100g (3½oz) desiccated coconut
100g (3½oz) pumpkin or hemp seeds
100g (3½oz) sunflower seeds
300g (11oz) dried fruit (such as chopped dried dates, figs, apricots, raisins or sultanas – I like a mixture)
1 tsp ground cinnamon
1. Preheat the oven to 170°C (325°F), Gas mark 3. Place the butter or coconut oil, the honey or syrup and the vanilla extract in a small saucepan and put on the heat to melt together.
2. Next, place the oat flakes, almonds, hazelnuts, desiccated coconut, pumpkin or hemp seeds and the sunflower seeds in a large bowl and mix. Add the melted butter (or coconut oil) and syrup mixture and stir really well to make sure it’s evenly combined.
3. Spread the mixture out in a large roasting tin, lined with baking parchment, if you like (but it’s not essential), and bake in the oven for 25 minutes or until the nuts and grains are a light golden brown. Stir the granola every 5 minutes so that it browns evenly in the oven.
4. Once brown, remove the granola from the oven and leave in the tray to cool, again stirring every now and then, scraping it from the bottom of the tray. If you transfer it into a bowl while it’s warm, it will go soggy.
5. When it has cooled down, mix in the dried fruit and cinnamon. Transfer to an airtight container and store at room temperature. It will keep well for up to one month.

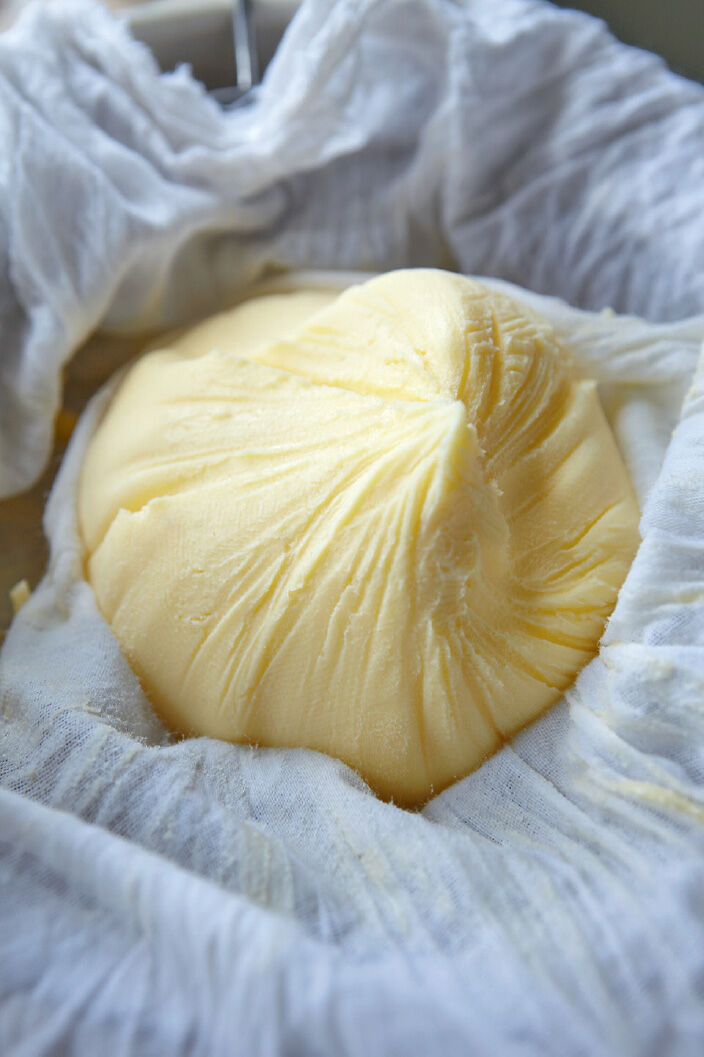
How to make butter and buttermilk
MAKES ABOUT 225G (8OZ) BUTTER
If you’ve ever over-whipped cream, you’ve been on your way to making butter. We make butter every day at the Ballymaloe cookery school and people are often really surprised at how easy it is. You can flavour it how you like, too – with herbs, spices or seaweed.
1 litre (1¾ pints) regular or double cream
2 pinches of sea salt, or dairy salt (if you can get it)
your favourite flavourings – chopped herbs, garlic, dried seaweed, icing sugar or spices (optional)
1. Pour the cream into the bowl of a food mixer and, using the whisk, whip the cream for 5–10 minutes on a medium-high speed (but not so high that it splashes everywhere) until it starts to split (as if you’ve over-beaten it). Continue to beat until the yellow fat separates from the buttermilk (you can use this buttermilk for baking). It will look completely scrambled.
2. Sit a sieve over a large, clean bowl. Place a double layer of muslin in the sieve – you’ll need it to be larger than the sieve as you want to be able to gather up the edges – then pour the contents of the food mixer bowl into it. With the muslin still in the sieve, bring up the edges and squeeze really hard to remove all the buttermilk. When all the buttermilk has been squeezed out, place the butter that remains in the muslin in a bowl and wash well in cold water, squeezing it well to remove every last bit of buttermilk. If you don’t do this the butter will go rancid after a couple of days.
3. Now pat the butter dry with kitchen paper, put it into a bowl and mix in the salt and any other flavourings you like, such as chopped herbs, garlic, dried seaweed, or even icing sugar and spice for melting over pancakes.
4. Shape the butter into a sausage shape by rolling it up in baking parchment, or into a rectangle, or whatever shape you like. You can also place it in a mould that you’ve lined with muslin, if you have one. When you’re happy with the flavour and the shape of your butter, place it in the fridge until needed. It will keep for 10–12 days if you’ve washed it free of all the buttermilk.
How to make yoghurt
MAKES 1 LITRE (1¾ PINTS) YOGHURT
Yoghurt is fun and easy to make and allows you to flavour it how you like. I love the unsweetened tang and slightly irregular texture that comes from a homemade version.
1 litre (1¾ pints) full-cream milk
25g (1oz) skimmed milk powder
1 tbsp natural yoghurt, live active culture yoghurt will work best (see tip)
1. Pour the milk into a saucepan and set on a gentle heat. As the milk begins to warm up, add the milk powder and stir to dissolve. Heat the milk until it reads 90°C (194°F) on a cooking thermometer. (If judging by eye, the milk will be sweet-smelling and just coming to the boil – steaming and starting to froth around the edges.) Remove from the heat and leave to stand and cool for 30 minutes or until it reads 40°C (104°F) on the thermometer (or the milk has stopped steaming and feels just tepid when you dip your finger in and leave it there for a few seconds).
2. Stir in the yoghurt, cover the pan with a clean tea towel and leave in a warm place (or in a flask) until the mixture thickens – which will take 4–5 hours.
3. After this time, remove the tea towel and transfer the yoghurt to a jar or bowl, then cover and place in the fridge overnight.
TIP
For your next batch of yoghurt you can use 1 tablespoon of this homemade yoghurt instead of the shop-bought yoghurt.

Scrambled eggs back in the shell
SERVES 1
This is a cute way to give scrambled eggs to little ones. I think the best scrambled eggs are cooked slowly over a low heat until almost set but still creamy, then taken out of the pan straight away to avoid overcooking.
1–2 eggs, as preferred
1 tsp regular or double cream
a little knob of butter
sea salt and freshly ground black pepper
To serve
hot buttered toast
1. Using either an egg topper or a little knife or spoon, carefully open the egg at the top as you would a boiled egg. Pour the egg into a saucepan and add the cream and butter, season with salt and pepper and beat well with a fork or whisk. Place the empty eggshell in an eggcup (see tip).
2. Scramble the egg over a low heat, stirring all the time. When the egg is just cooked but still soft and a bit runny, spoon it carefully back into the eggshell. Serve with a teaspoon and lots of hot buttered toast.
TIP
You can rinse the eggshell and dry it in the oven, if you wish. Place it, cut side down, on kitchen paper in a very cool oven, preheated to 100°C (212°F), Gas mark ¼ for 10 minutes.
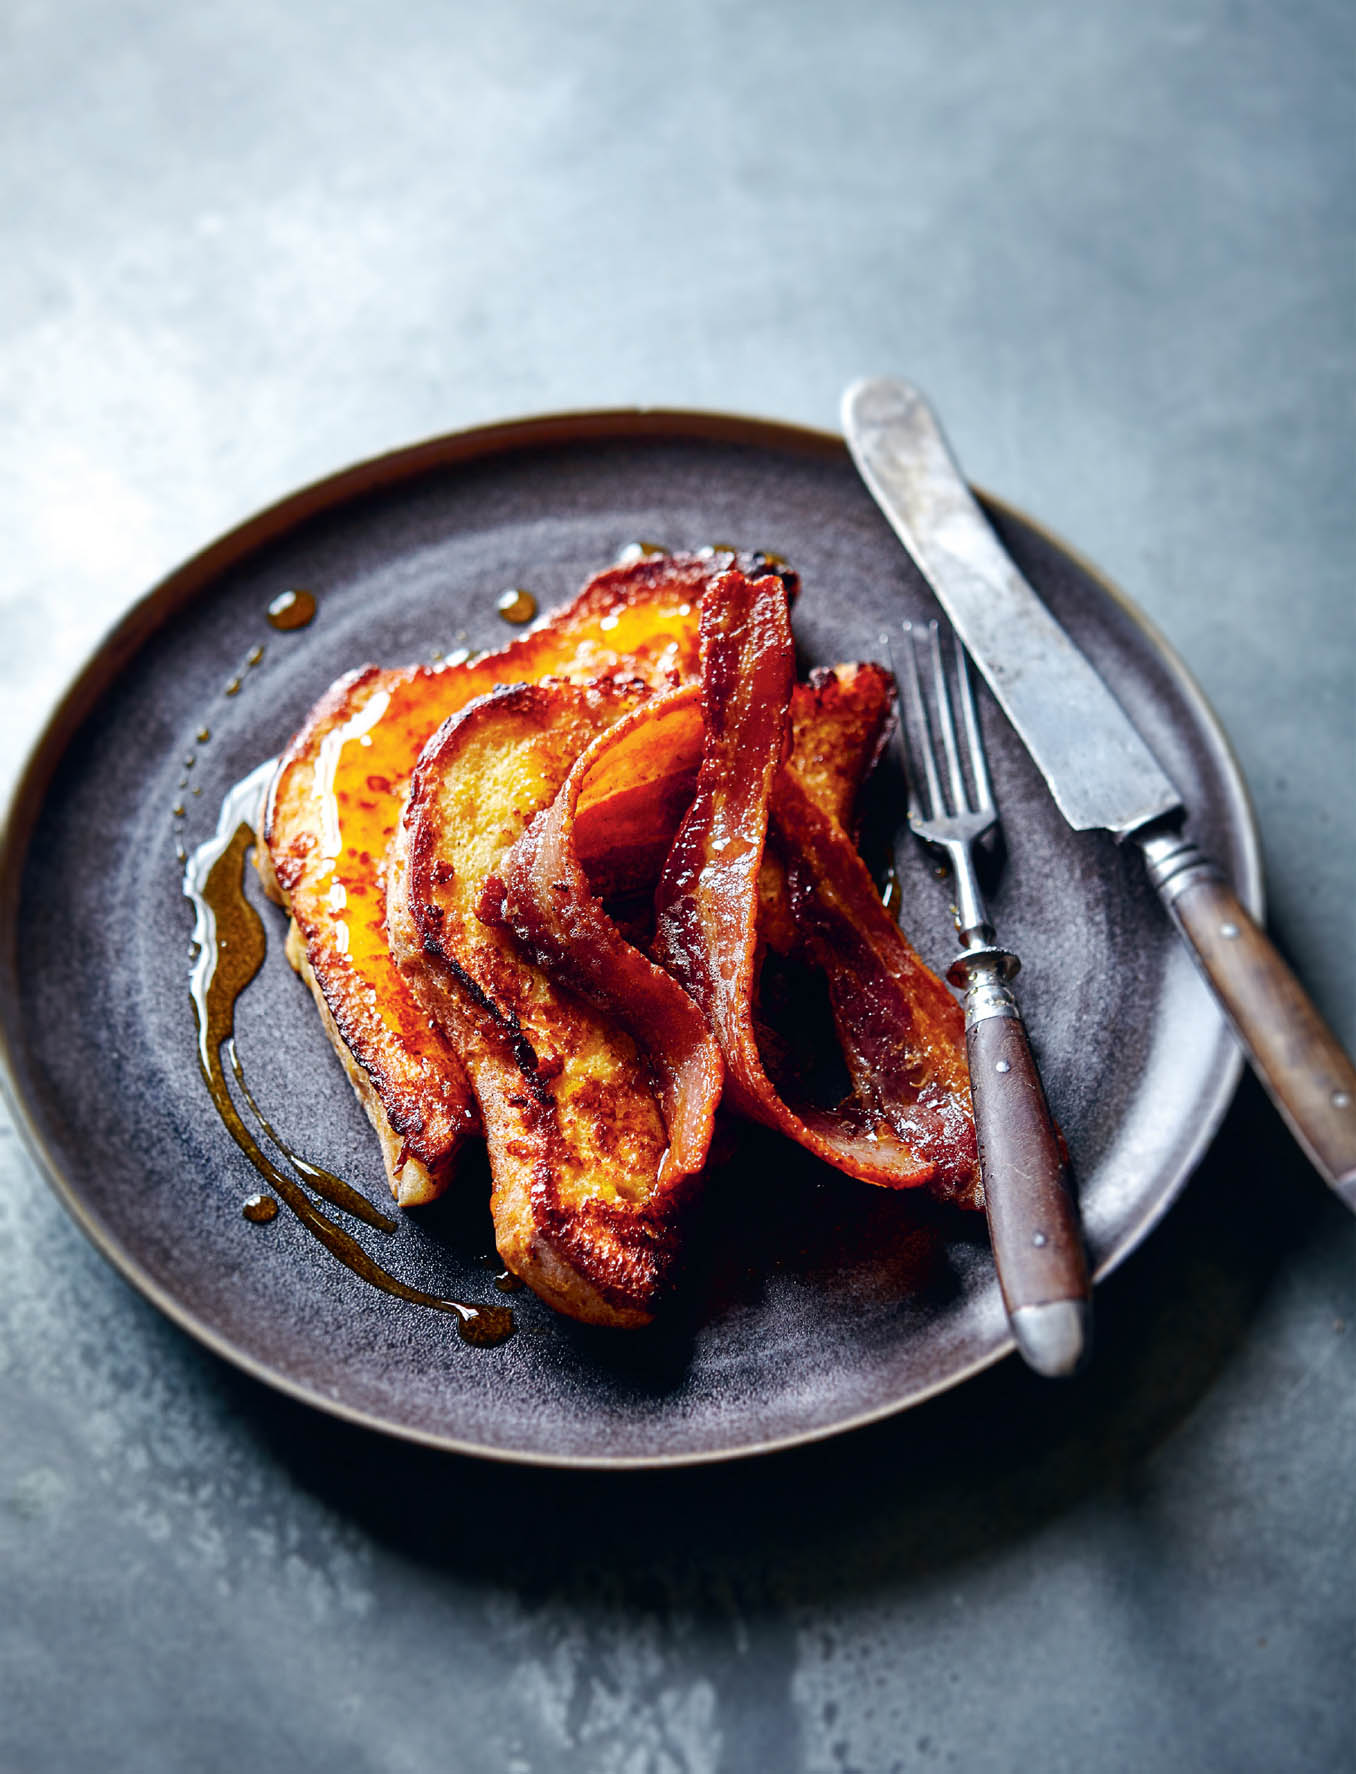
Sweet eggy bread
SERVES 4
Sweet, comforting and completely delicious, one taste of this brings me back to my childhood in an instant.
2 large eggs
4 tbsp regular or double cream
1–2 tbsp caster sugar, to taste
1 tsp vanilla extract or ½ tsp ground cinnamon
a little pinch of sea salt
50g (2oz) butter
4 large slices of white, wholemeal or sourdough bread
To serve
maple syrup, crispy bacon slices or icing sugar
1. In a bowl large enough to dip slices of bread into, whisk the eggs, cream, sugar and vanilla extract or cinnamon powder together with a pinch of salt.
2. Melt a knob of the butter in a frying pan over a medium-high heat until foaming. Dip both sides of a slice of bread into the egg mixture and then fry on both sides, adding more butter as needed, until golden. Keep warm in a low oven while you repeat with the remaining bread.
3. Repeat until all the slices of bread are fried. Serve drizzled with maple syrup and slices of crispy bacon or dusted with icing sugar.
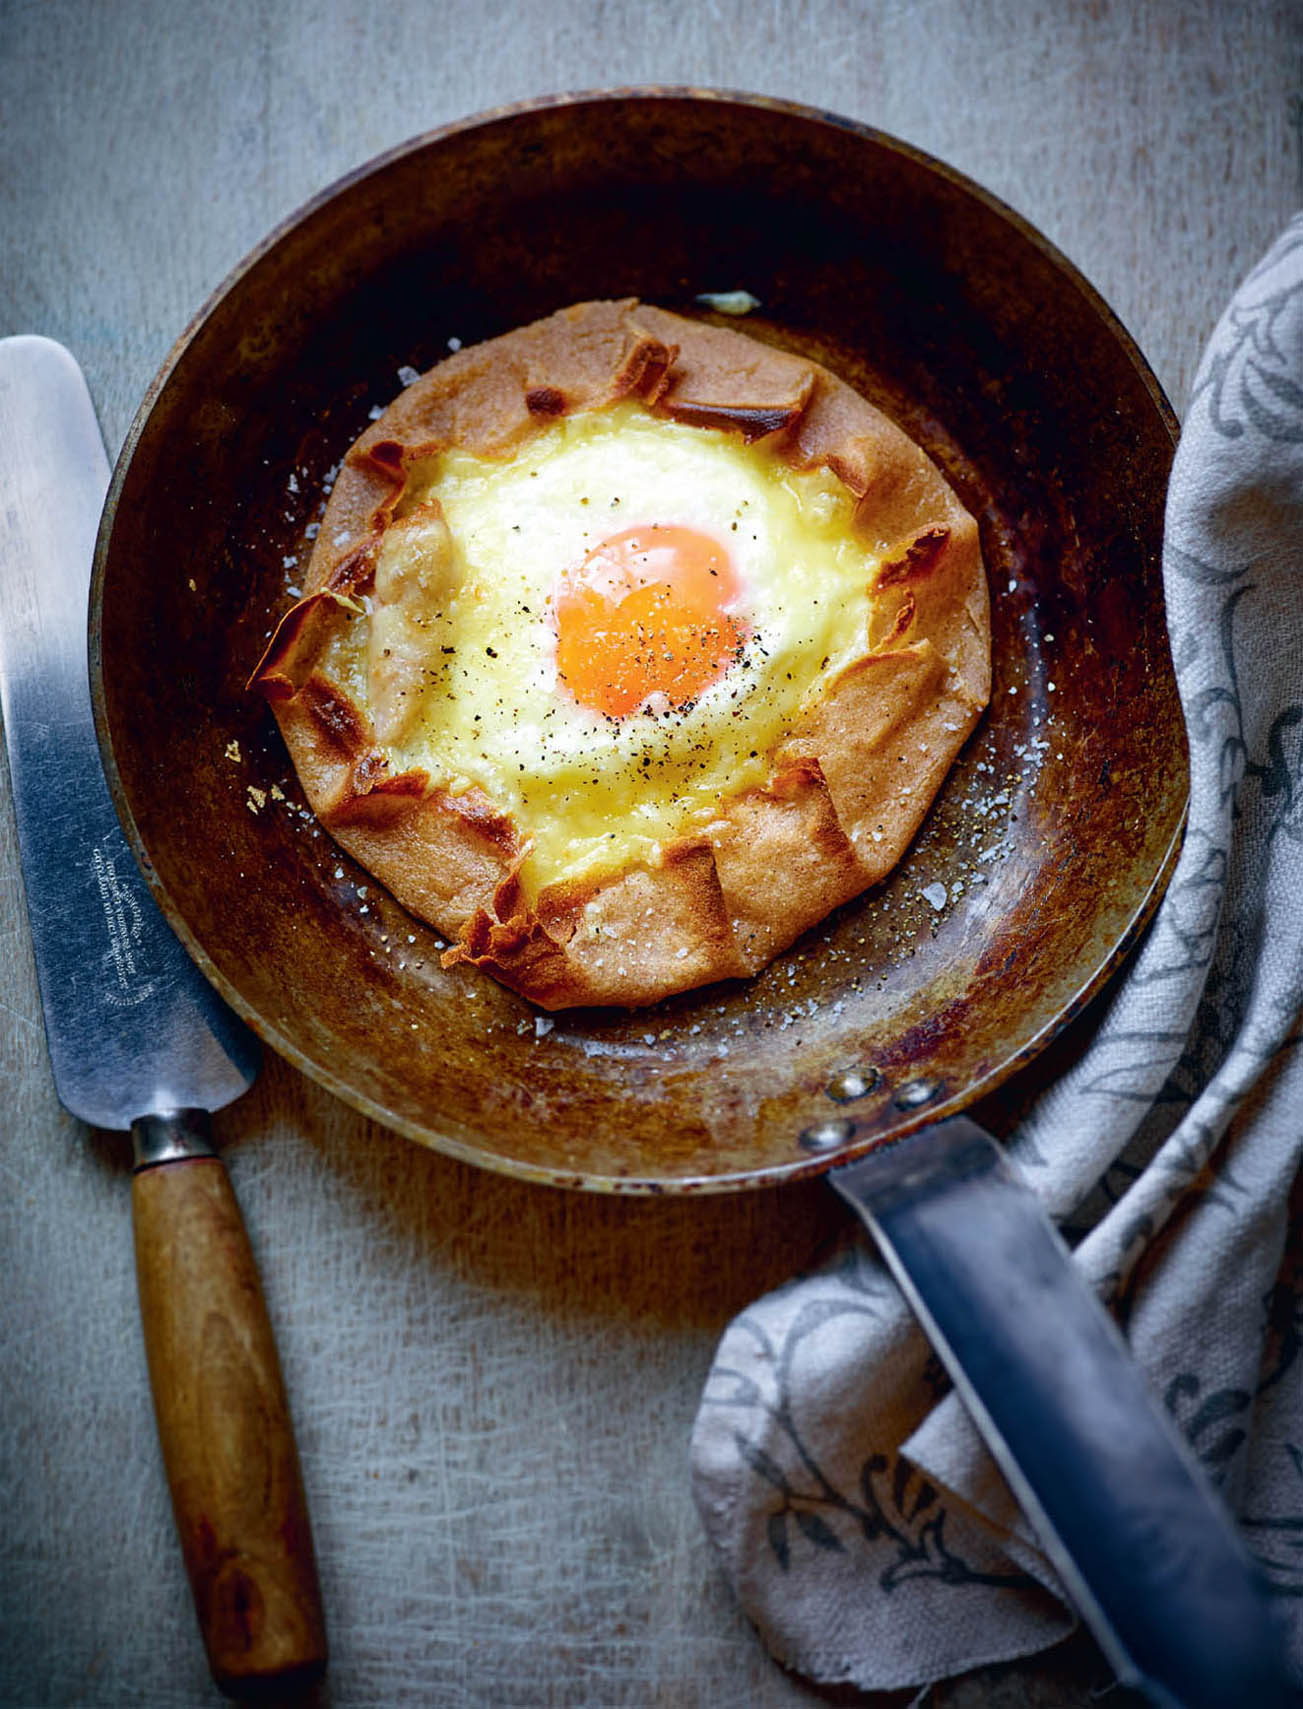
Buckwheat crêpes with ham, cheese and eggs
SERVES 6
I love the nuttiness (and added nutrition) that buckwheat flour brings to these crêpes. This makes for a superb brunch or supper.
For the batter
100g (3½oz) buckwheat flour
½ tsp sea salt
1 egg
200ml (7fl oz) milk
40g (1½oz) butter, melted
For the filling
200g (7oz) Gruyère, Emmental or Comté cheese, grated
6 slices of best-quality ham
a little butter, for frying
6 eggs
sea salt and freshly ground black pepper
1. First, make the batter. Mix the flour and salt together in a bowl. Put the egg, milk and melted butter into a measuring jug, add 100ml (3½fl oz) water and whisk. Make a well in the centre of the dry ingredients, then pour the liquid into the well, whisking all the time to gradually draw in the flour from the edges of the bowl, until you have a smooth batter with a few bubbles on top. Use straight away, or it can store in the fridge for up to 24 hours.
2. Preheat the grill to medium or the oven to 200°C (400°F), Gas mark 6 (see tip).
3. Heat a frying pan (ovenproof if you’re using the oven). Rub a piece of kitchen paper in the butter and wipe it over the base of the pan – do this each time you put in a new batch of batter. Pour in some of the batter and swirl it around to coat the base of the pan with a thin layer. Allow to fry until it sets and is golden underneath, then flip it over and immediately place a slice of ham in the centre of the crêpe. Cover the ham with grated cheese, leaving a little dip in the middle, and break the egg into the dip. Fold up the edges of the pancake to meet the edge of the egg white, then place the pan under the grill or in the oven until the cheese has melted and the egg is cooked. Repeat for all the other crêpes, serving each finished one at once.