
Полная версия
Collins Complete Hiking and Camping Manual: The essential guide to comfortable walking, cooking and sleeping
2 When you open a fuel bottle the contents may be under pressure, so hold it away from you and others as you unscrew the cap so that fuel doesn’t spurt into your face.
3 Screw the Pump snugly into the Fuel Bottle. Make sure the Control Valve is all the way in the OFF (–) position.
4 Pump the Plunger until firm resistance is felt, 15 to 20 strokes if the Fuel Bottle is full, 40 to 55 pump strokes if the bottle is half full.
5 Check for any leaking fuel at any of the O-ring seals on the pump. Don’t light the stove if you see fuel leaks.
6 Lubricate the end of the fuel line with saliva or oil and insert the Fuel Line into the hole in the pump.
7 Snap the Catch Arm securely into the slot on the Pump. Failure to lock the catch arm can result in the fuel line and fuel tank detaching from the stove during operation, an extremely hazardous condition. I always teach “click and lock, ready to rock.” Don’t light the stove until the catch arm locks into place with a click.
8 Snap the pot support legs into place and put the stove on a suitable flat, insulated surface before lighting.
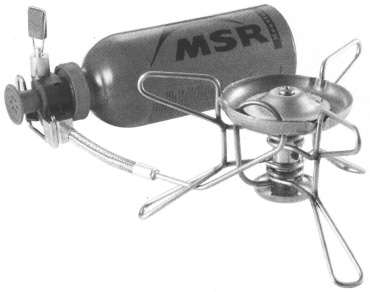
MSR Whisperlite White Gas Stove with Fuel Bottle, Pump, and Burner(Image courtesy of Mountain Safety Research)
Operating the Stove
Before lighting the stove make sure that:
The stove assembly has no fuel leaks.
The catch arm is locked and stove is properly assembled.
The area is clear of flammable material and spilled fuel.
Priming
The stove must be preheated or “primed” in order to operate properly. Insufficient preheating may result in flare-ups or poor performance.
1 Open the Control Valve and allow approximately 1 teaspoon of fuel to flow through the jet opening in the burner into the priming cup at the base of the burner. (Alcohol may be used as an alternate priming fuel to reduce soot buildup from the preheat process.) Note: Do not overprime. Do not fill the priming cup with fuel. Only a small amount of fuel is needed. Excess fuel can result in a dangerous flare-up.
2 Turn the Control Valve off.
3 Check for any leaks at the Control Valve, Pump, Jet, and Fuel Line. If leaks are found, do not use the stove.
4 Light the Priming Fuel.
5 Place the Windscreen around the stove. Make sure the pump and fuel bottle are kept outside the windscreen.
Turning the Stove On
1 When the preheating fuel has burned to a small flame or gone out completely, open the Control Valve gradually and light the stove at the burner. You should get a steady blue flame.
2 If the stove:• Goes out, turn the Control Valve off. Wait for the stove to cool and return to the “priming” step.• Burns with erratic yellow flame when you first start it, close the Control Valve and allow the stove to preheat longer. (Priming with a separate fuel source like a small squeeze bottle of alcohol is helpful here.)• Burns intermittently with yellow and blue flames, turn the Control Valve down but not off until the stove burns with a steady blue flame, then slowly turn the Control Valve up.
3 While the stove is in operation periodically pump the Plunger 3 to 5 strokes as needed to keep enough pressure in the Fuel Bottle.
Turning the Stove Off
1 Close Control Valve firmly. The flame will burn for 1 to 2 minutes as excess fuel in the fuel line is exhausted. Wait for the stove to cool before disassembling.
2 To remove the burner, unlock the Catch Arm, making sure that you are away from heat, sparks, or flame, and remove the Fuel Line from the Pump.
3 Keep the Pump assembled in the Fuel Bottle or, to be sure the Control Valve does not open by mistake, remove the Pump and replace it with the Fuel Bottle Cap. The fuel bottle will be under pressure, so hold it away from you and others as you open it.
LIGHTWEIGHT/ULTRALIGHT CARTRIDGE STOVES
Cartridge stoves and fuel weigh less than typical white gas stoves. There are a number of models that are light enough to creep into the ultralight category:
MSR Pocket Rocket For those times when you want a lightweight stove for cooking for larger groups, the MSR Pocket Rocket is one of the lightest cartridge stoves available. It sets up quickly and boils a quart/liter (1000 milliliters) of water in under 3.5 minutes.
JetBoil The JetBoil is an innovative approach to a lightweight cooking system. It merges a canister stove and burner with an integrated insulated cooking mug so you leave your pots behind. Unlike other canister stoves it has its own integrated windscreen and a built-in heat exchanger that captures heat typically lost with other stoves. This makes the unit more fuel efficient per canister of fuel. It boils 2 cups (473 milliliters) of water in 2 minutes.


Long-distance hikers have come up with the lightest weight stoves. A number of these stoves simplify the stove to its most basic element—the burner—losing the fuel bottle, pump, and fuel line. With this simplicity comes some loss of functionality. Don’t expect these stoves to let you control the flame to a low simmer; they are pretty much on-and-off stoves, whose main purpose is to do one thing: boil water. Some stoves provide a metal shield to move over the flame to block some of the heat as the “simmer control.” Here are some of the ultralight options:
Alcohol Stoves There are a number of commercial alcohol stoves on the market. The Trangia Stove from Sweden is one example and is generally sold as a stove/pot system (www.trangia.com). One of the benefits of the stove is its simplicity. It consists of a burner cup that fits inside a windscreen. Fill the burner with alcohol, assemble the stove, and light. Pro: Lightweight. No complicated parts to break or fuel lines that clog. Alcohol is available around the world as a fuel. Con: Not easy to adjust temperature. Limited burn time.
Aluminum Can Stoves—Alcohol Fuel These lightweight stoves are designed for small cooking loads—1 to 4 cups of water. It’s a boil-water-only stove. The stove is made from two aluminum cans, a smaller 12-ounce can soldered inside a larger 14-ounce can. These stoves are designed to burn alcohol only. You don’t get any lighter than this. You can find instructions for how to build this stove at the PCTHiker Web Site (www.pcthiker.com).
Esbit Tablet Stoves The Esbit stove is a folding steel stove. When opened there is space for a small flammable stove tablet about the size of a boxes of matches. Light the pellet and place it in the stove. Like other ultralight stoves it has only two cooking levels, on and off. One tablet will bring 1 pint of water (473 milliliters) to a rolling boil in under 8 minutes. You typically get 12 to 15 minutes of usable burn time per tablet. The Esbit Wing Stove is an even simpler, more compact, and lighter weight version.
Sierra Stove This stove burns twigs, bark, pine cones, and other wood as well as charcoal and other solid fuels. It has an adjustable speed fan that creates a forced ventilation system providing more efficient burning. It boils a quart/liter of water in about 4 minutes (www.zzstove.com).
MISCELLANEOUS GEAR
We all have our favorite little things that we bring on the trail. Here are a few gadgets you might want to consider on your next trip:
LED headlamp One of my most indispensable items on any trip. An LED headlamp is lightweight, is easier to use in camp than a flashlight, and will go for hundreds of hours on a few batteries.
Good trowel When digging catholes, a strong lightweight metal trowel is a real help. It’s also good for building a mound fire. Forget the cheap plastic ones—they snap the first time you hit a rock.
Multitool For years it was a Swiss Army knife, but that’s now been replaced with a lightweight multitool. These have the advantage of having other tools like a pair of pliers useful for fixing stoves and packs. If you are being weight-conscious, the little multitools weigh much less and offer almost as much as the big ones do.
Camp chair I admit it, it’s a bit of a luxury, but I really like pulling out my Crazy Creek chair at the end of the day and relaxing with a cup of tea and a good book. As a feeble attempt to justify the added weight, you can use the chair for a sleeping pad, and the chair itself makes a good leg splint (www.crazycreek.com).
Mosquito Netting Hat This might be necessary if hiking in northern latitudes in spring and summer. Combined with a good wide-brimmed sun/rain hat, this will keep the bugs and the DEET out of your face.
Portable Power If your trip requires you to bring electronic gear with you (satellite phone, digital camera, PDA, laptop), you need to have power. The Brunton SolarRoll is a collapsible solar power cell. It weighs 17 ounces and can produce 14 watts of power—enough to juice up your PDA, mobile phone, or digital camera. It can also charge larger items like laptop computers (www.brunton.com).
TECHNOLOGY IN THE WILDERNESS
Technology is all around us, and more and more technology is coming into outdoor pursuits. In a broad sense we all use technology outdoors—everything from high-tech clothing to LED headlamps, pocket stoves, waterproof-breathable rain gear, internal-frame backpacks, and ultralight tents.
For many people, the word technology really refers to taking electronic gadgets into the outdoors. Some view this as an intrusion on the experience of the wilderness; others feel it is perfectly appropriate. If you choose to bring a music or DVD player, that’s your personal choice. You should just be aware that the people in the next campsite may not be at all interested in hearing your device, so bring headphones.
Outside of entertainment devices there are devices designed to help you on your wilderness experience. Here are some of the things out there:
Mobile phones or satellite phones Mobile phones are now ubiquitous, so it’s no surprise that people take them along on hiking trips. A mobile phone or a satellite phone can be a big help in an emergency situation, allowing you to contact help almost immediately (if you have reception). There is a great deal of discussion in outdoor programs about the use of mobile phones, satellite phones, and radios. Some people feel that these are essential hiking safety devices, some feel that they intrude on the experience of being in the wilderness, and others feel they are mistakenly used as a crutch. They can be useful tools in an emergency situation. However, it is important to recognize that none of these communication technologies works in every location and therefore shouldn’t be relied upon completely. A lot of people assume that satellite phones work everywhere. Not true—sat phones require a clear view of the sky in order to establish a connection with a satellite. You often can’t make a connection in deep forests, canyons, deep gorges, or other locations. And any electronic device can run out of power or break, so never rely on it in place of first-aid training, knowledge of the area, and a good trip plan. If you carry a phone or a radio, don’t delude yourself that help is only a phone call away. Even with a phone, it still may take rescue personnel hours or even days to get to you, so you must be prepared to deal with the situation. At a conference on wilderness safety someone told the story of a fellow who went hiking with his mobile phone. He got lost and called the rangers to tell him where to go. They asked him what landmarks were nearby, and there weren’t any obvious ones. It turned out he had no map or compass and had absolutely no idea where he was. He assumed that because he had a mobile phone, all he had to do was call and ask for directions. But the rangers couldn’t figure out where he was or how to help him find his way back. At the same time hikers and mountaineers have been seriously injured and called for help on a mobile phone. Without the phone to speed the rescue people would have died.
Global Positioning System (GPS) Receivers GPS receivers use satellites to identify your exact position. They can be a great help in planning your route, keeping track of your location, and navigating from place to place. Even so, a GPS is not a replacement for knowing how to use a map and compass. For more on GPS, see page.
Personal Radios Personal radios using the FRS or GMRS have become increasingly popular when hiking. They can be helpful for larger groups who split up. FRS radios have a range of about 1/2 mile (0.8 kilometer), while GMRS have ranges up to 5 miles (8 kilometers).
Personal Locater Beacons (PLBs) Personal Locator Beacons are another satellite technology. This is a land-based version of rescue beacons that have been in use by mariners for some time. When activated the beacon sends an emergency signal to a satellite along with your exact position. This is not a phone, so all the signal means is “I have an emergency.” All PLBs must be registered so the responding agency knows who initiated the call (in part to discourage false activations). If a signal is received, the Rescue Coordination Center telephones the beacon’s owner and/or emergency contact to check to see if the beacon going off is a false alarm. If it cannot be determined that the signal is a false alert, SAR teams are dispatched to locate the person in distress. Pushing the button means mobilizing a potentially huge rescue effort, so it had better be a real emergency. There are certainly real uses for these devices, particularly for people who travel in remote parts of the world.
The ongoing debate about the use of these types of technology when hiking is that carrying these devices creates a false sense of security, the “Hey, if something goes wrong we just use the Satellite Phone, PLB, GPS, etc.” approach. Some people are justifiably concerned that people may go into wilderness areas without sufficient experience because they assume they can always get rescued, or don’t take a map because they have a GPS receiver. What’s important to remember is that these are just tools and have limitations. They get left in camp, batteries die, somebody steps on the thing or drops it off a cliff. If you don’t have it or it doesn’t work, you’d better have the skills to handle the situation. These devices should be used as an adjunct for emergency assistance or navigation, not as a replacement for sound training and good judgment.

CHAPTER 3
Cooking and Nutrition
ENERGY AND NUTRITIONAL REQUIREMENTS
Caloric Requirements
Food Sources
BASIC FLUID RECOMMENDATIONS
MENU PLANNING
How Long are You Going to be Out?
Ease of Preparation
Weight
Packaging/Repackaging
Spoilage
Eating on the Trail
GENERAL COOKING GUIDELINES, INGREDIENTS, AND RECIPES
Sample Recipes
OUTDOOR BAKING
FOOD EQUIVALENTS
MEASUREMENT EQUIVALENTS
Food can be one of the most important and complicated elements to plan for a trip. You have to be aware of nutritional requirements, individual dietary needs, and amounts required to feed the entire group. Plus, the food should be appetizing—there is nothing better than a delicious hot meal to bolster morale after a long, hard day of hiking, and nothing worse than trying to keep up your strength while staring into a cup of disgusting mush. Seasoned through-hikers may be more concerned with weight than taste or variety, but it can be difficult to get people, particularly inexperienced backpackers, to eat a meal that doesn’t taste good.
ENERGY AND NUTRITIONAL REQUIREMENTS
Good nutrition is just as important, if not more so, in the outdoors as it is at home. Food supplies energy to your body to fuel your physical activity and keep you warm. Food also provides essential nutrients that your body cannot produce: vitamins, minerals, certain amino acids, and certain fatty acids. The amount of energy the body takes in from food is measured in units of heat energy called calories. When planning a menu for a trip, it is important that the foods be high in calories in order to meet these requirements.
CALORIC REQUIREMENTS
Below are the general ranges for calories required to maintain good health, and what you will typically need to carry. Keep in mind that the food weights are averages, since carrying only dehydrated foods, for example, would mean carrying less weight. Also, at higher altitudes the caloric requirements per day increase.
Activity Caloric Requirement/day Food Weight/day Your body’s basal metabolism 1,500–2,000 Three-season backpacking or normal exercise output 2,500–3,000 1.75–2 pounds (0.8–0.9 kilograms) Cold-weather backpacking or strenuous exercise output 3,500–4,000 2–2.25 pounds (0.9–1 kilograms) Winter backpacking or very strenuous exercise output 4,500–6,000 +2.5 pounds (+1.1 kilograms)FOOD SOURCES
Carbohydrates (4 calories/gram, energy released quickly) regularly make up about 50 percent of a person’s daily caloric intake. For hiking trips you may need to increase this to 70 percent of the daily caloric intake. Starches and sugars provide both quick energy and longer-term fuel. Processing and refining can reduce the nutritional value of carbohydrates, so it is best to use whole grains, raw sugar, and other unprocessed foods in your menu. Simple carbohydrates (sugars such as trail snacks or sweets) are broken down very quickly by the body for quick energy release, and complex carbohydrates (such as pasta) release energy more slowly.
Fats (9 calories/gram, energy released slowly) are another important source of energy when hiking. It is recommended that about 25 percent of your daily intake be fats (during the winter this should increase to about 40 percent). Fats take longer to break down than carbohydrates and thus are a better source of long-term energy. For example, adding a spoonful of butter or margarine to a cup of hot chocolate will increase the caloric rating and the length of time the energy is released.
Proteins (4 calories/gram, energy released slowly) are an essential part of any diet. Proteins are the essential building blocks of all tissue. Each protein in the body is made up of twenty-two amino acids. Fourteen of these amino acids are produced in the body, and the other eight, known as the “essential amino acids,” are not. Both types are essential to a complete diet. Foods such as meat, poultry, fish, eggs, and milk products are called “complete proteins” since they contain all eight essential amino acids. However, there are limitations to carrying fresh meats, poultry, and eggs due to weight or spoilage. Canned or vacuum-sealed pouches of fish or precooked chicken can be carried. Soybeans and soy products are also complete proteins.
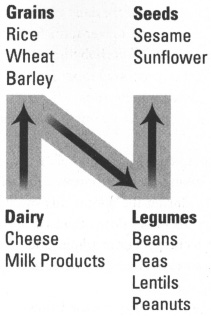
Foods such as beans, lentils, peanuts, cereals, vegetables, and fruit are incomplete proteins since each of them doesn’t contain all eight amino acids. However, by using proper combinations, an outdoors menu can be planned that allows you to get all eight amino acids daily. An easy way to remember this is using the “Nutritional N” to create food combinations. The N contains four elements: dairy, grains, legumes, and seeds. Any two adjacent food groups in the N, when combined, provide complete protein.
Dairy Cheese, milk, yogurt
Grains Breads, crackers, pasta, granola and other cereals, rice, couscous, bulgur, bran, potatoes, corn, oats
Legumes Beans, peas, lentils, peanuts, tofu
Seeds Sunflower, sesame
The phrase “Don’t Get Love Sick” (Dairy, Grains, Legumes, Seeds) may help you remember the four groups and the order in which they form the nutritional N. Just string the four elements together in alphabetical order. A combination of any two consecutive initial letters of the phrase will provide complete proteins. Dairy and Grains (D & G), for instance, will form a complete protein together, whereas dairy and legumes will not. The other two complete protein combinations are Grains and Legumes (G & L) or Legumes and Seeds (L & S).
Complete Protein Combinations
Sample Complete Protein Combinations
Dairy (or eggs) and grains Macaroni and cheese; cheese and crackers; pasta with Parmesan cheese; milk and cereal.
Grains and legumes Rice and beans; refried beans and flour tortillas; peanut butter and bread; rice or bread and tofu.
Legumes and seeds Peanuts and sunflower seeds in gorp (see page).
BASIC FLUID RECOMMENDATIONS
Water is an essential part of personal nutrition on the trail. It aids digestion, regulates body temperature, keeps cells healthy, and carries waste from the body. Dehydration leads to headaches, fatigue, and irritability. Mild dehydration is often easily relieved by drinking half a quart (1/2 liter) or more of water. Remember that these general recommendations are for backpacking in temperate forest conditions. You may need to increase your fluid intake based on your own metabolic needs, physical condition, medical condition, age, sex, or different weather conditions (such as high temperature and humidity), high altitude, or in specific ecosystems (such as desert climates).

TRICKS OF THE TRAIL
Gorp Everyone has his or her own favorite recipes for “gorp,” which stands for Good Old Raisins and Peanuts. I start with equal parts raisins and peanuts and then add a quick sugar source. You can increase the variety of the mix by adding smaller amounts of different sugar sources. When using chocolate, consider the melting factor. Also, if you use items like sunflower seeds that are smaller than most of the other things in your mix they will eventually filter down to the bottom of the bag, so be prepared on the last day to find a bag full of sunflower seeds. Here are some items to consider: dried papaya, pineapple, apples, apricots, dates, banana chips, mango, or cranberries (Craisins); coconut; almonds; cashews; brazil nuts; peanuts; chocolate, butterscotch, or carob chips; chocolate malt balls; M&M’s; chocolate-covered raisins, peanuts, or almonds; yogurt-covered raisins, peanuts, or almonds; sunflower seeds; rice crackers; dried green peas; pretzels; sesame stix. Be inventive!