Полная версия
Exactly
It involves the notion of flatness. It involves the notion that a surface may be created that is, as the Oxford English Dictionary has it, “without curvature, indentation or protuberance.” It involves the creation of a base from which all precise measurement and manufacture can be originated. For, as Maudslay realized, a machine tool can make an accurate machine only if the surface on which the tool is mounted is perfectly flat, is perfectly plane, exactly level, its geometry entirely exact.
An engineer’s need for a standard plane surface is much the same as a navigator’s need for a precise timekeeper, as John Harrison’s, or a surveyor’s need for a precise meridian, such as that drawn in Ohio in 1786 to start the proper mapping of the central United States. The more prosaic matter of the making of a perfectly flat surface, a critical part of the machine-made world, required only a little ingenuity and a sudden leap of intuition—both these gifts combining in the late eighteenth century in the workshop of Henry Maudslay.
The process is simplicity itself, and the logic behind it flawless. The Oxford English Dictionary illustrates it nicely with a quotation from the James Smith classic Panorama of Science and Art, first published in 1815, that “to grind one surface perfectly flat, it is … necessary to grind three at the same time.” While it has to be assumed that this basic principle had been known for centuries, it is commonly believed that Henry Maudslay was the first to put it into practice, and create thereby an engineering standard that exists to this day.

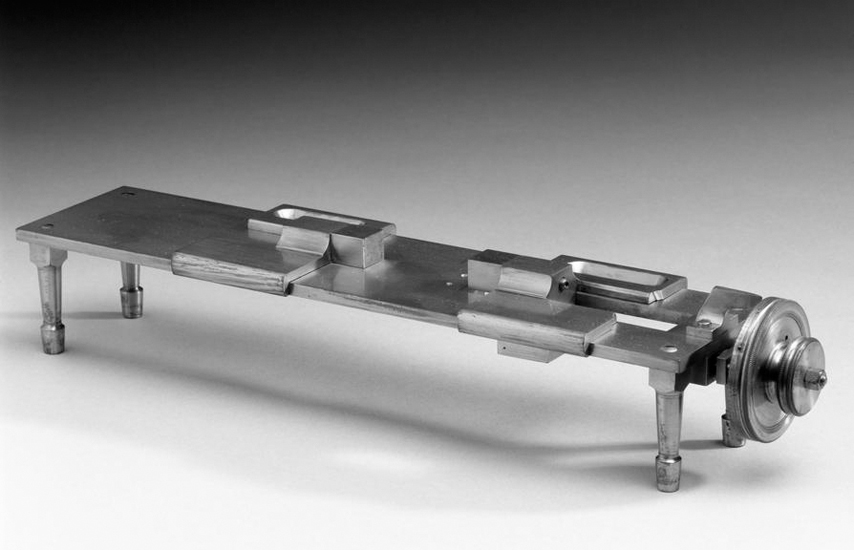
So accurate was Henry Maudslay’s bench micrometer that it was nicknamed “the Lord Chancellor,” as no one would dare have argued with it.
Photograph courtesy of the Science Museum Group Collection.
Three is the crucial number. You can take two steel plates and grind them and smooth them to what is believed to be perfect flatness—and then, by smearing each with a colored paste and rubbing the two surfaces together and seeing where the color rubs off and where it doesn’t, as at a dentist’s, an engineer can compare the flatness of one plate with that of the other. Yet this is a less than wholly useful comparison—there is no guarantee that they will both be perfectly flat, because the errors in one plate can be accommodated by errors in the other. Let us say that one plate is slightly convex, that it bulges out by a millimeter or so in its middle. It may well be that the other plate is concave in just the same place, and that the two plates then fit together neatly—giving the impression that the flatness of one is the same as the flatness of the other. Only by testing both these planes against a third, and by performing more grinding and planing and smoothing to remove all the high spots, can absolute flatness (with the kind of near-magical properties displayed by my father’s gauge blocks) be certain.
AND THEN THERE was the measuring machine, the micrometer. Henry Maudslay is generally also credited with making the first of this kind of instrument, most particularly one that had the look and feel of a modern device. In fairness, it must be said that a seventeenth-century astronomer, William Gascoigne, had already built a very different-looking instrument that did much the same thing. He had embedded a pair of calipers in the eyeglass of a telescope. With a fine-threaded screw, the user was able to close the needles around each side of the image of the celestial body (the moon, most often) as it appeared in the eyepiece. A quick calculation, involving the pitch of the screw in inches, the number of turns needed for the caliper to fully enclose the object, and the exact focal length of the telescope lens, would enable the viewer to work out the “size” of the moon in seconds of arc.
A bench micrometer, on the other hand, would measure the actual dimension of a physical object—which was exactly what Maudslay and his colleagues would need to do, time and again. They needed to be sure the components of the machines they were constructing would all fit together, would be made with exact tolerances, would be precise for each machine and accurate to the design standard.
As with Gascoigne’s invention of a century before, the bench micrometer’s measurement was based on the use of a long and skillfully made screw. It employed the basic principle of a lathe, except that instead of having a slide rest with cutting or boring tools mounted upon it, there would be two perfectly flat blocks, one attached to the headstock, the other to the tailstock, and with the gap between them opened or closed with a turn of the leadscrew.
And the width of that gap, and of any object that fitted snugly between the two flat blocks, could be measured—the more precisely if the leadscrew was itself made with consistency along its length, and the more accurately if the leadscrew was very finely cut and could advance the blocks toward one another slowly, in the tiniest increments of measurable movement.
Maudslay tested his own five-foot brass screw with his new micrometer and found it wanting: in some places, it had fifty threads to the inch; in others, fifty-one; elsewhere, forty-nine. Overall, the variations canceled one another out, and so it was useful as a leadscrew, but because Maudslay was so obsessive a perfectionist, he cut and recut it scores of times until, finally, it was deemed to be wholly without error, good and consistent all along its massive length.
The micrometer that performed all these measurements turned out to be so accurate and consistent that someone—Maudslay himself, perhaps, or one of his small army of employees—gave it a name: the Lord Chancellor. It was pure nineteenth-century drollery: no one would ever dare argue with or challenge the Lord Chancellor. It was a drily amusing way to suggest that Maudslay’s was the last word in precision: this invention of his could measure down to one one-thousandth of an inch and, according to some, maybe even one ten-thousandth of an inch: to a tolerance of 0.0001.
In fact, with the device’s newly consistent leadscrew sporting one hundred threads per inch, numbers hitherto undreamed of could be achieved. Indeed, according to the ever-enthusiastic colleague and engineer-writer James Nasmyth, who so worshipped Maudslay that he eventually wrote a rather too admiring biography, the fabled micrometer could probably measure with accuracy down to one one-millionth of an inch. This was a bit of a stretch. A more dispassionate analysis performed much later by the Science Museum in London goes no further than the claim of one ten-thousandth.
And this was only 1805. Things made and measured were only going to become more precise in the years ahead, and they would do so to a degree that Maudslay (for whom an abstraction, the ideal of precision, was perhaps the greatest of his inventions) and his colleagues could never have imagined. Yet there was some hesitancy. A short-lived hostility to machines—which is at least a part of what the Luddite movement represented, a mood of suspicion, of skepticism—briefly gave pause to some engineers and their customers.
And then there was that other familiar human failing, greed. It was greed that in the early part of the nineteenth century played some havoc with precision’s halting beginnings across the water, to where this story now is transferred, in America.
Конец ознакомительного фрагмента.
Текст предоставлен ООО «ЛитРес».
Прочитайте эту книгу целиком, купив полную легальную версию на ЛитРес.
Безопасно оплатить книгу можно банковской картой Visa, MasterCard, Maestro, со счета мобильного телефона, с платежного терминала, в салоне МТС или Связной, через PayPal, WebMoney, Яндекс.Деньги, QIWI Кошелек, бонусными картами или другим удобным Вам способом.


