Полная версия
The Sport of Pool Billiards 1

The Sport of Pool Billiards I
Techniques and Training based on PAT Part 1
by
Ralph Eckert
2

table of contents
© Litho-Verlag e.K., Wolfhagen, Germany
www.litho-verlag.de
www.billiardbook.com
All rights reserved
Printed in Germany
1st edition 2015
ISBN print: 978-3-941484-96-2
ISBN ebook: 978-3-941484-97-9 (epub)
ISBN ebook: 978-3-941484-98-6 (pdf)

3

table of contents
Table of Content
Introduction ..............................................................5
1. Before the First Shot ...........................................8
1.1 Posture and Overlearning .........................................8
1.2 Stance .....................................................................10
1.3 Upper Body and Head ...........................................12
1.4 Cue Handling .........................................................13
1.5 Hand Bridge ............................................................16
1.6 The Mechanical Bridge ..........................................20
2. Training Program ................................................22
2.1 Speed .....................................................................27
2.2 Straightness ............................................................42
2.3 Stroke Efficiency, Follow Shots ..............................60
2.4 Draw Shot ..............................................................68
2.5 Small Area Positions ..............................................77
2.6 Large Area Positions ..............................................92
2.7 Frozen Rail Situations ...........................................102
2.8 Endless Drill .........................................................112
2.9 Movement Cycle (as the basis for your personal playing rhythm) ..................................................120
2.10 Freestyle .............................................................133
4

table of contents
3. Rules and Types of Game ................................140
3.1 8-Ball ....................................................................141
3.2 9-Ball ....................................................................145
3.3 Straight Pool ........................................................148
4. The Material ......................................................151
4.1 The Table .............................................................151
4.2 Cues .....................................................................154
4.3 Balls .....................................................................159
5. Practice Games ................................................163
5.1 Equal Offense ......................................................163
5.2 Bowlliards .............................................................166
5.3 Progressive X-Ball ...............................................171
5

Introduction
Introduction
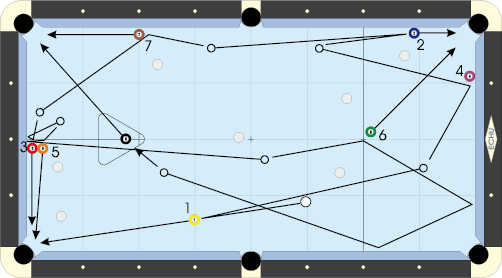
Here‘s an idea of how a perfect 8-ball game could go:
Start with a draw shot from the 1 on the 4, then a natural roll from the 4 on the 2, then another draw shot on the 2, which is frozen to the rail, to get into a good position for the 7.
Use a follow stroke on the 7 with a little left spin and from there a little draw stun shot on the 3 with a bit of right spin to get into position for the 5. From there a stun shot on the 5 just above center, then a natural roll to the 6 via two cushions, giving it a little right spin and using about Speed 2.5. This puts us in a perfect position for the 8! Then it‘s just a stop shot to secure victory!
What use is all this information to beginners? They‘ll never be able to put it into practice at the start. You‘ll have to play for a long, long time, maybe even years, before you can hope to play such shots with any ease. In this training program I want to show you how you can acquire the necessary skills
6

Introduction
as effectively as possible. And at the same time demonstrate that pool billiards is not just a game, but a sport that you can actually train with the help of the PAT system! Not simply so that you can get the better of people that consider pool billiards to be „just a game“, but so that you have more fun and, more importantly, enjoy playing at a higher level thanks to the skills acquired in this program.
Pool billiards is one of the most exacting sports in the world when it comes to hand-eye combination! It is a game that has been played all over the world for centuries. There is virtually no other activity where you can take such pleasure in your skill, even in your old age, at knocking colored plastic balls into holes with a wooden stick!
I hope that this book will prove to be a reliable guide in helping you to learn to play the sport of pool billiards. The training program uses the PAT method.
PAT (Playing Ability Test) is a testing and evaluation system for short, medium and long-term training. A system that tests the skills required to play a good game of pool in 10 different areas with appropriate exercises. A system that is unique in that it is the only system that has been officially recognized by the World Pool Association (WPA) because of its proven efficiency.
PAT has three different levels plus PAT Start. This book is therefore the first of a series of at least three volumes. PAT Start for leisure players, PAT 1 from beginners to advanced. PAT 2 from advanced to very advanced players and PAT 3 very advanced to world-class! Join us, but remember ...
„Easy promises make for little trust.
7

Introduction
Taking things lightly results in great difficulty.
Because the sage always confronts difficulties,
He never experiences them.“
*Lao Tse, circa 400 BC.
From the 63rd Chapter of his book „Tao Te King“.
Ralph Eckert,
Mannheim, February 22, 2006
8

before the first shot
Before the First Shot
Posture and Overlearning
In this chapter I will only outline a few basic principles of cor-rect posture! You should also look at the tips given in Chapter 2.2 „Straightness“ on one-handed play and your personal anatomically correct standing position!
The exercises described there are the most important, but each aspect is gone into in more detail in the relevant chapter (for example, shot straightness).
If you are a genuine beginner, then try to put this advice on posture and cue handling into practice. If you have any prob-lems, ask your club trainer to help you. If you have already been playing for some time, then just check your posture. Look at yourself in a mirror or maybe even film yourself. This way you can see what you are doing right and where there is room for improvement. If you‘re doing everything right, that‘s great. But what if you discover some little mistake that you have been making for years that maybe prevents you from making any more progress? Well, there are two possibilities. Either you stick with your mistake and try at least to stabilize your level of performance with the help of the exercises in this program, or you take the time to iron out the mistake that has crept into your game! In sports that require a high level of precision and skill (to which pool billiards belongs), this means some ten to fifteen thousand repetitions before the mistake has been cor-rected, depending on your age and the number of years you have been making the mistake! If you are a real beginner, then you‘ll have to get used to overlearning! Overlearning is the term used in sport to describe the notion of repeating a movement
9

Chapter 1
over and over again, beyond the point of initial mastery, until it becomes automatic!
And you know how tough the demands are in pool when it comes to precision and skill. Young beginners can reckon on at least 5000 repeats before a movement becomes automatic.
You should give a lot of thought to this subject and then decide what‘s best for you. And most importantly, when you have de-cided for yourself what you want to do, don‘t take any notice of other people‘s criticisms! That will strengthen your confidence. It‘s only players who haven‘t really come to terms with the fact that they need to practice long and hard to achieve mastery who become sensitive and unsettled when others comment on their cue handling or posture. And this leads to a lack of confidence.
But what should you repeat X-thousand times? We‘ll come to that later. First of all a few words about textbook posture. The photos of different aspects of posture on the next few pages are merely intended as a sort of starting point. Later I will go into more detail. Details that are extremely important to observe and which can also be applied by each person individually to fit his or her own style.
10

before the first shot
Stance
11

Chapter 1
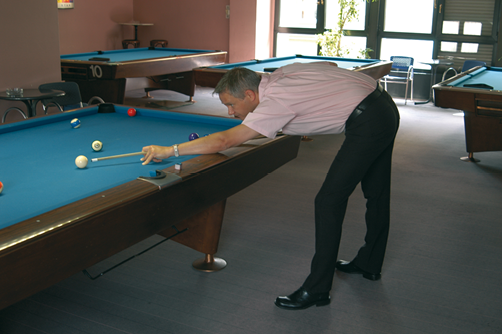
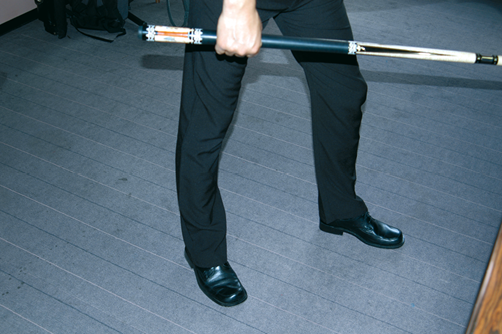
The most important thing to remember is that to achieve maximum stability your legs should be slightly apart and in a staggered position. If your legs are parallel, you will tend to sway backwards or forwards.
If your legs are one in front of another you will tend to sway to the right or left. So it‘s best to stand with your legs apart as shown in the photo.
Furthermore, the rear leg should be stiff and not bent at the knee. If you do not heed this advice you will tend to move your leg, but except for the playing arm nothing should move, if at all possible. You could also say that bending the knee introduces an additional variable into the equation which increases the susceptibility to mistakes. Such small mistakes make themselves felt almost exclusively in situations of stress. Where the front leg is concerned you can handle the situation according to comfort and depending on your size: it can be bent or stretched.
Andreas Huber, German national coach
One of the most common mistakes made by the sportsmen I train is in the area of stance and distribution of weight. Now that so much snooker is shown on TV and trainers say (quite rightly) that the rear leg should be straight, players now tend to put all the weight onto this leg. But this can (unknowingly) lead to all kinds of mistakes: Snooker players make sure they put some of the weight on their front leg (by turning the front knee slightly inwards).
If the center of gravity is shifted too much to the back, the player literally „falls“ onto his shot when following through and involuntarily applies side spin to the ball. Simply tensing the thigh muscles slightly, or consciously trying to feel the floor with your front foot is enough to eliminate this source of error.
12

before the first shot
Upper Body and Head
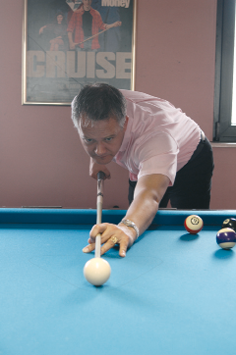
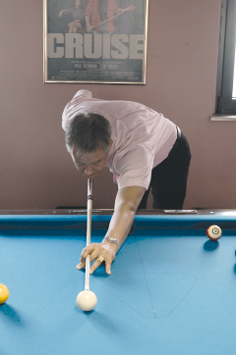
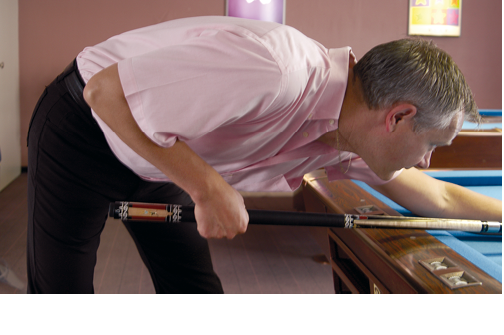
Bend your head and upper body down over the cue, holding the cue as horizontally as possible. It is virtually impossible, and not even necessary, to hold the cue completely horizontally. Your head should be directly above the cue, i.e., looked at from above, the cue should move in a straight line directly below your chin and nose or between your eyes. Make sure you do not bend down too far so that your chin is almost touching the cue (a hand‘s breadth or four fingers is ideal), because in this case (depending on your size) you will not have enough room to move the cue correctly with your playing arm. As long as you have enough room to play, you can bend as far as you want over the cue. The older you get, the more difficult you will find it to bend down, in any case.
13

Chapter 1
Andreas Huber, German national coach:
As Ralph has already said, the player should rely on his own feeling when trying to find the right stance – especially when it comes to head and cue alignment. Nearly everyone has a dominant eye and the cue will generally be slightly off-center biased towards this eye so that the player can accurately recognize a straight shot when he has played one. Ralph will go into this in more detail later, as this is the second „little mistake with enormous consequences“, along with wrong weight distribution in the stance. A lot of top players improved their game enormously in the past just by correcting this „little mistake.“
Cue Handling
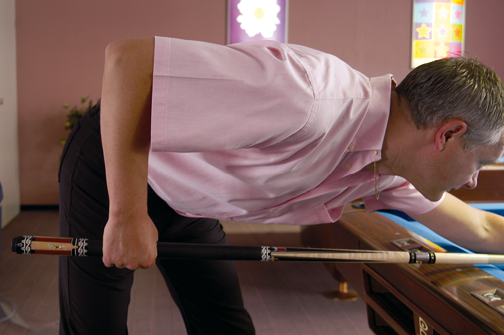
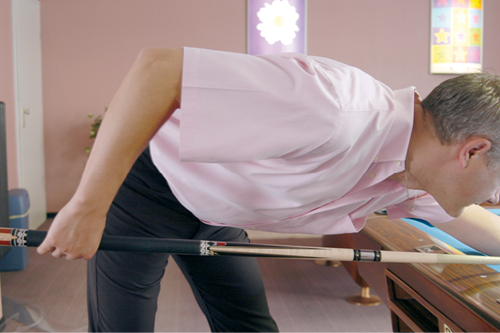
With very few exceptions (e.g. the break), the bridge arm (front arm) should be stretched out almost to the full. If you bend it too much, or even rest your forearm on the table, there is a danger that you will be leaning forward too far with your whole body when you shoot. In this case the bent arm would act like a spring and could lead to more mistakes. I will describe the hand bridge through which we guide the cue in a later chapter. There are several points to be remembered when it comes to the shooting arm (back arm):
In a good cue grip your hand should cradle the cue be-tween your thumb and four fingers, with the middle, ring and little finger slightly looser so that they give a little on the backswing but still remain on the cue, helping to guide it. If the cue grip is too tight there will be too much movement in the upper arm when you swing, making it virtually impossi-ble to cue in a straight line. The upper arm will automatically move slightly, but for a straight cue movement this should be kept to a minimum.
14

before the first shot
Your wrist should not move at all if possible.
The starting position for the forearm is, as I said before, more or less vertical and the cue grip should be approxi-mately on a level with the rear leg.
The upper arm should initially be perpendicular to the forearm.
When shooting, the upper arm automatically follows through. There is nothing wrong with this because other-wise you would tense your muscles in order to bring the shot to a halt and a tense shot is the last thing we want.
The elbow, seen from above, is directly above the cue,.
Depending on your stature, it may not be easy for you to observe all these points at once. Don‘t be afraid to ask someone more experienced for advice (your club trainer, for example). Just imagine what the league or national coach would think if you were to start playing in their team with a bad cue grip?
15

Chapter 1
16

before the first shot
Hand Bridge
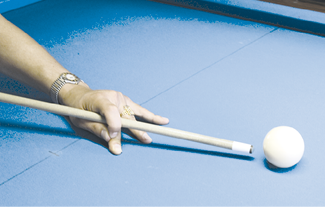
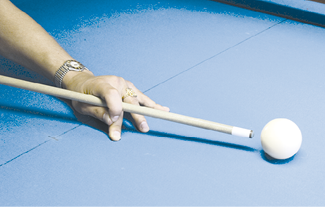
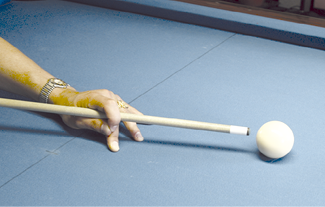
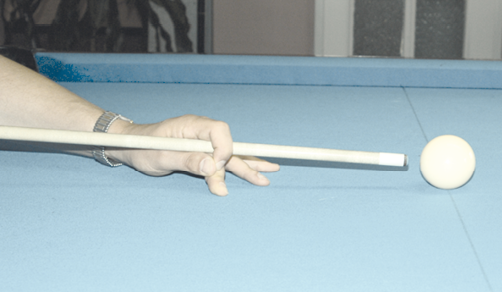
Before I start bombarding you with details here are a few photos and brief explanations on the subject of hand bridges:
Low
The middle finger is pushed down onto the table slightly.
Middle
This is the standard bridge where the middle, ring and little finer are well spread out to maximize sta-bility.
High
The fingers are brought more closely together to raise the height of the bridge.
17

Chapter 1
When I am training this is what I normally tell the players:
Start off with an open bridge.
Move the thumb towards the „top“ joint (closest to the ball of the hand) of the middle finger.
The index finger has to be lifted at this point.
Then I look for a crease between the thumb and middle finger with my cue.
The index finger should still be raised!
It may help if you bend your wrist slightly.
When you have found the crease you should swing the cue through the open bridge as if you were about to shoot.
Then, while you are swinging the cue, slowly move the index finger over the cue towards the thumb.
Make sure the index finger does not impede your control of the cue in any way!
The index finger should be placed firmly above the thumb without getting in the way of the cue when you swing!
The purpose of the index finger is to prevent the cue going off center when you actually shoot, not during the swinging!
Andreas Huber, German national coach:
Two short comments:
1. Bending the wrist also helps to prevent the fingers getting in the way of the cue. If the wrist is straight, shots often end up crooked.
2. The bridge hand is like a third leg and has to bear some of the weight. If there is no weight on the guiding hand, shots will frequently be erratic and it becomes more difficult to make a really clean impact on the ball.
Sometimes the cue even moves „towards the light“ (the last place it should be).
18

before the first shot
A lot of people feel more comfortable with an open bridge at the beginning. I do understand this, but a closed bridge is still the most effective in pool billiards, as opposed to snooker where the open bridge is the norm. Since shooting techniques in pool billiards are more complex, but actually hitting the ball is easier, it goes without saying that in pool billiards you have to use a closed cue bridge to guide the cue, especially if you have to stretch out further across the table or if you want to add a bit more side spin to your shot. Players who use an open bridge tend to raise the cue during the shot which is not at all desirable and often leads to miscued. What I am trying to say is that with a closed bridge, not only can you have a greater effect on the ball, but you can also control it better. So the earlier you get used to the closed bridge, the better.
If you still refuse, then we‘ll do a deal! You make an honest attempt and I‘ll accept your decision at the end of it. An honest attempt must last for at least two weeks! That means for two weeks you play every ball with a closed bridge – however unpleasant you find it.
The excuse I hear time and time again is that even a lot of the top players play with an open bridge occasionally. Well, yes. That may be true but these players have all played with a closed bridge for years and can cue in a straight line whenever necessary. There‘s no way out of it! If the cue doesn‘t glide through your fingers smoothly, try putting a bit of talcum powder on it. Not body or baby powder – that‘s too fine and perfumed and will just make your cue dirty in the long run! My tip: just use talc from the drugstore. It‘s very cheap and perfectly adequate!
19

Chapter 1
Andreas Huber, German national coach:
Players should be allowed to choose – between a closed bridge, a closed bridge or alternatively a closed bridge…
20

before the first shot
The Mechanical Bridge
The mechanical bridge, sometimes called a „rest“ or simply „bridge“, is used to extend a player‘s reach on a shot where the cue ball is too far away for normal hand bridging. It comes in a number of different forms.
When using a rest you should still remember to aim with both eyes. The cue should still be centered, but is now in front of and not below the head. The cue is guided loosely between the thumb and fingers. It is important to make sure that the bridge arm is horizontal and the mechanical bridge itself rests firmly on the table in such a way that you can quickly remove it if necessary. If you look at the photos you can see how to use a rest correctly.


