
Полная версия
Opening playing variants against various defense systems
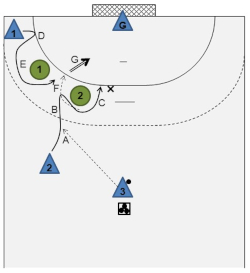
- As soon as


-
(Figure 2)
-
→ Pass the ball to

→ Try to break through directly (H) (= option 2).
→ Move to the center (J). In this case,

→ If

- If the there is no shooting option following the initial action of

A5: Crossing without the ball on different positions
Recommended for overcoming these defense systems: all
Requirement:

Description:
Another option for team play in width is crossing without the ball.
Factors of success:
- Vigorous piston movement of the player initiating the crossing.
- Dynamic movements and proper timing when taking on the crossing.
- Proper timing when passing the ball.
Implementation:
Crossing movements without the ball may be used against any defense system. The speed of attack can be increased considerably through the pass after the crossing movement. Moreover, the crossing without the ball may be used specifically to bring an offensively covered player back into play and into a good shooting position.
A5.1 Preparatory exercise 1: Ball familiarization
Setting:
- The players make teams of 2, with one handball per team.
- The first two teams of 2 (four players in total) line up next to each other on the goal line; the remaining teams line up behind them (see figure below).
Course 1 (not in the figure):
- The first two teams of 2 run to the other side in parallel while passing their ball (

- As soon as the groups have arrived at the opposite goal line, they run back to the upper goal line, while passing their ball again.
- The teams should do several rounds (two lines each), using different passing variants (direct passes, bounce passes, passes behind the back, and so on).
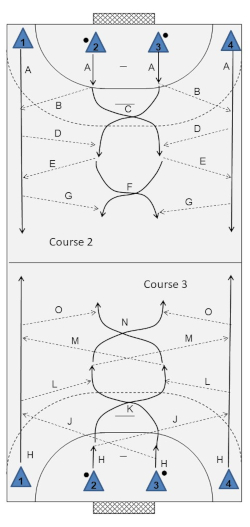
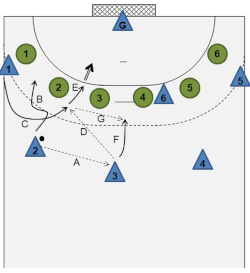
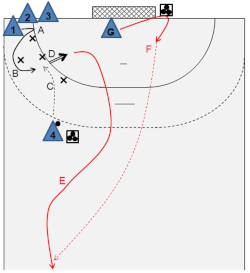
Course 2 (upper half figure):
- The two teams of 2 now are a group of 4.
- Initially,
- The four players start running in direction of the opposite goal line (A).
-
- After the pass,
- They pass the ball back to the player on the wing (E) before initiating another crossing (F) and then receiving another return pass (G), and so on.
- In the upper half, the players switch positions and repeat the sequence on their way back.
- The players should run four lines in total, each player on each position once.
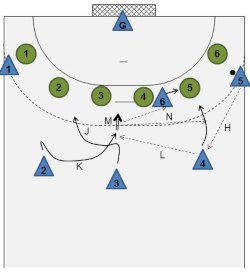
Course 3 (bottom half figure):
- The four players start running in direction of the opposite goal line (H).
-
- After the pass,
- Now they should play long passes to the opposite wing (M), initiate a crossing without a ball in the center (N), catch the return pass (O), and so on.
- In the upper half, the players switch positions and repeat the course on their way back.
- The players should run four lines in total, each player on each position once.
A5.2 Preparatory exercise 2: Goalkeeper warm-up shooting
Setting:
- Define the starting positions with two cones (see figure).
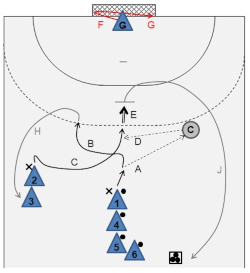
Course:
-
- Following the pass,
-
- The goalkeeper should observe the players from the goal center, touch the left post in a well-timed manner (for shots at the right) (F), and then try to save the ball shot at the right side of the goal (G).
-
- Immediately after the coach’s pass (D),
A5.3 Implementation: Crossing without a ball in two variants
Course:
- Two teams play against each other 6-on-6. The defense players play a 6-0 defense system.
- The attacking players play 10 attacks; they get one point for each goal.
- Switch tasks after 10 attacks. Which team scores highest?
Offense tasks:
- In each attack, the players should use one of the two initial actions.
- They may keep playing freely afterwards.
(Figure 1)
Initial action 1:
- Following the pass from
-
- Afterwards,
- The players may do the course on the right side as well, with and crossing without a ball.
(Figure 2)
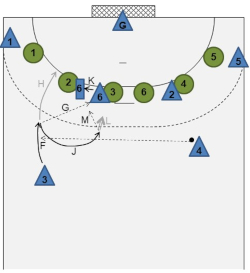
Initial action 2:
-

-
-
-
- The players may do the course on the right side as well, with
A6: Tricky interaction of the back position and wing players for a quick goal
Recommended for overcoming these defense systems: all
Requirement:
Description:
This series of exercises focuses on interaction of the back position players with the wing players.
Factors of success:
- Fast and dynamic wing players.
- The back position player must be able to play passes behind the back securely.
- Passing variants of the back position player.
- Timing of interactions.
- Quick catching and shooting preparation of the wing player.
Note:
The specific passing variant requires players who are well-trained in the basics. This series of exercises has higher requirements concerning team play and interaction; therefore, it is advisable to practice the individual sequences on a position-specific basis. The players should implement the sequences in a game only after they can pass the ball in a secure and proper way.
A6.1 Preparatory exercise 1: Ball familiarization
Setting:
- Three players each make a team, having one handball. They stand in a triangle, as shown in the figure.
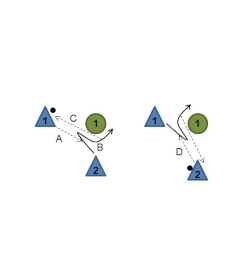
(Figure 1)
(Figure 2)
Course:
-
-
- As soon as
- After some passes, the players switch positions, so that each player has practiced the sequence on each position.
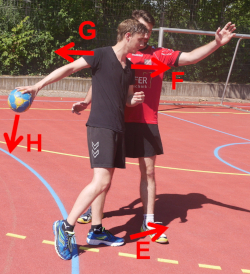
“Pass behind the back” sequence:
- Once
- The trunk should be rotated. Left shoulder to the front (F), right shoulder to the back (G).
- The ball should be passed to
Step order:
Body feint: left
right
left (here correct: The foot has been put directly next to the defense player).
A6.2 Preparatory exercise 2: Wing player ball handling
Setting:
- Position four cones as shown in the figure.
- Position a ball box next to the goal for the fast break initiation.
Course:
-
-
- After the shot,

- Repeat the course on the opposite wing position and so on.
Basics for the final overall course:
- Right before he starts running (in order to receive the pass from the back position player),
A6.3 Implementation: Interaction of the back position and wing players
Setting:
- Define the playing field with a cone.
- The players should do the course on both sides alternately.
Course:
-
-
- In the meantime,