Полная версия
3D drawing. Tutorial 3D drawing
The angle and distance from the clock to the camera while taking a preliminary photo. In the photograph on which the drawing was drawn, the clock is photographed almost vertically from above, from a short distance. About the small distance between the clock and the camera, says a big difference in the sizes of the numbers 12 and 6. In the picture to the right.
The angle and distance from the picture to the camera while shooting the picture. In the drawing, viewers look and take pictures, almost from a horizontal direction, but see the clock as if they were looking at the clock from above. Therefore, there are similar distortions of the perspective (geometry) of the 3D drawing.
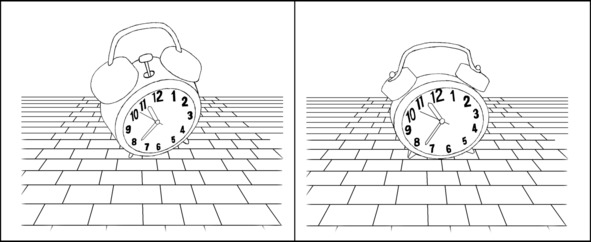
In the left picture.
Original watch stretched to a round dial.
In the right picture.
Something like this might look like a clock, if first, correctly build the perspective of the clock. Another thing is that it would be problematic to draw such a height, such a size clock. Because the drawing would turn out almost to the horizon. Perhaps this is why the picture was squeezed vertically?
Criticism is only fruitful then
when she, in condemnation, indicates that
what should be that which is bad.
Lev Tolstoy.Following the advice of Leo Tolstoy, I criticize fruitfully, I point out what should be that which is bad.
How to avoid a similar mistake in drawing perspectives.
The first way.
Pre-build the projection of the clock. On this correct projection, apply details, colors, shadows, highlights, reflections from those watches whose photographs were liked by the customer or the artist himself.
The second way to avoid this error.
Take a picture of the watch yourself at the right angle and from the right distance.
How to draw such a clock correctly will be very clear and clearly shown in this course. Or in one of the lessons on my Patreon page.
https://www.patreon.com/ArtistFarit
A chapter in a book or exercise on Patreon will be called “A Cylinder Lying Horizontally.”
The second example
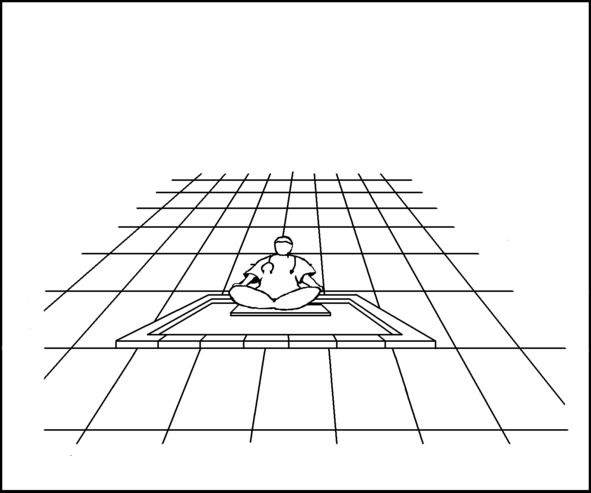
Pool, and a man sitting on a raft. The picture is clearly drawn from the photograph. The photograph of the pool was not taken at the same angle from which we look at the drawing of this pool. Therefore, I “see” that the surface of the sides of the pool and the surface of the water in the pool are not parallel to the surface on which the drawing is drawn. The pool in the picture is located, under a strong slope from us. Unless of course, this pool has a rectangular shape. If the pool is drawn in the form of a trapezoid, then it is drawn correctly. I have never seen pools in the form of a trapezoid, but this does not mean that such pools do not exist. Exceptions, as you know, confirm the rule. I decided that a rectangular pool was drawn, but with errors in perspective. For me, this is another example where you can show why you get such errors in drawing the perspective of a 3D drawing.
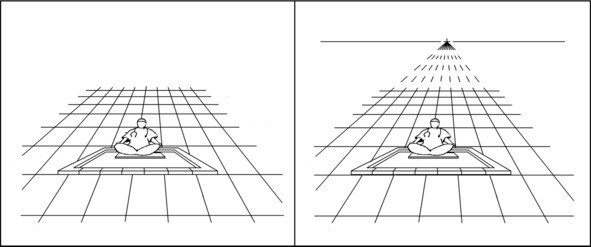
This pattern is drawn on rectangular tiles. Due to the presence of seams between the plates, we can find the horizon of the site on which this picture is drawn. We continue the seams of rectangular plates until they intersect with each other. So we find the horizon of the platform on which the pool is drawn.
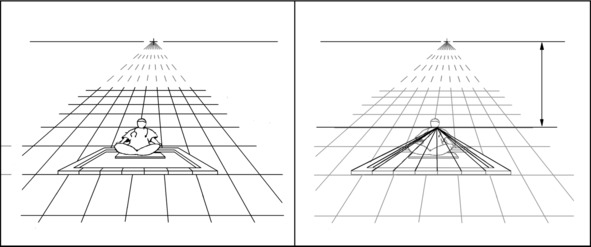
In the left picture.
The original drawing with the painted horizon of the site.
In the right picture.
Search for the horizon of the original pool photo. From the lines of the side edges of the pool we can find the horizon of the original photograph of this pool. The horizon in the photograph with which the pool was drawn is located at the intersection of the sides of the pool. We continue the line of side sides of the pool. The continuation of the sides intersects on the horizon. The horizon of the original photograph in which this drawing was drawn is at the height of the shoulders of the seated person.
It can be seen that the horizon of the site and the horizon of the drawn pool do very much not coincide. Therefore, similar errors are obtained in the perspective of the drawing.
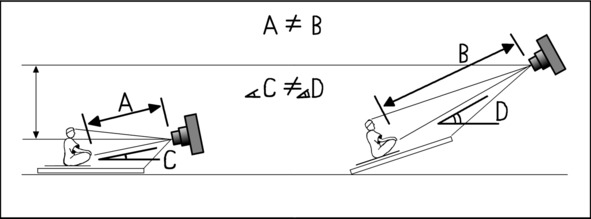
In the left picture.
Conditions for shooting the photograph with which they drew the pool. The photograph of the pool (according to which this picture is drawn) was taken from a lower height. A photograph of the pool was taken from the height of the shoulders of a seated person.
In the right picture.
Conditions for shooting the picture. We look at the figure from the height of human growth (a standing person). Therefore, it seems that the pool is not parallel to the surface on which it is painted. But even if you sit down and look at the picture from a small height, this error can no longer be corrected.
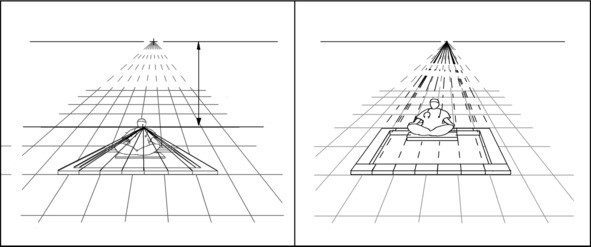
In the left picture.
Original drawing with non-coincident horizons of the site and drawing.
In the right picture.
An example of what this pool should look like if you draw it in compliance with the laws of perspective (geometry). The continuation of the side sides of the pool intersect on the horizon line of the site. Correcting the geometry of objects is relatively simple. It is especially simple to correct (and draw) the perspective (geometry) of rectangular objects. Unfortunately, the “geometry” of a seated person is more difficult to fix. The person (just redrawn from the photo), in the right figure, turned out to be tilted back. Since the horizon of the photograph of a person remained in the same place, at the height of his shoulders. To correct the perspective of the “geometry” of a person, you need to photograph a person from the right distance, at the right angle, from the right height.
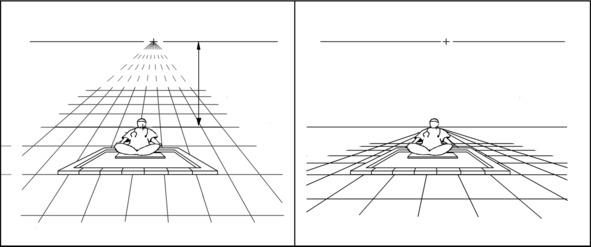
In the left picture.
Original drawing with non-coincident horizons of the site and drawing. In the right picture.
The original drawing of the pool is left, while a new platform is drawn, the horizon of which coincides with the horizon of the pool. The photograph on which this drawing was drawn looked something like this. A pool with its horizon coinciding with the horizon of the site looks more correct. In my humble opinion.
The discrepancy between the real horizon and the horizon in the figure can sometimes be understood. Example: An artist paints a hole (pit, mainsail) in asphalt. In hole, the artist draws his own, separate horizon of the picture, different from the real horizon of the site. This kind of dips (grottoes) with its own horizon, a very common and popular form of 3D drawing.
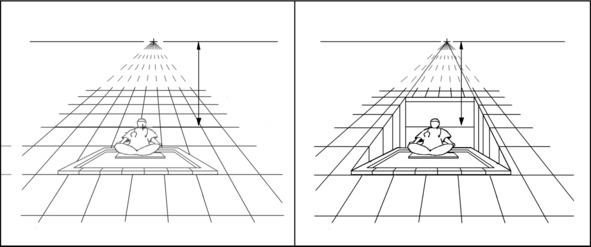
In the left picture is the original.
In the right picture.
A possible version of the picture with a dip (pit) in the plates. In a dip, behind a person’s back, one can see his own horizon of this drawing. The pool is located in a dip, very peculiar. The pool side closest to us lies at the site level, and the far (rear) side of the pool lie well below the site level.
If there is no second artificial horizon in the drawing, the perspective of the drawing should be oriented to the real horizon. Then the picture will not look strange in terms of the laws of perspective.
But this is not the only mistake in the perspective of this picture.
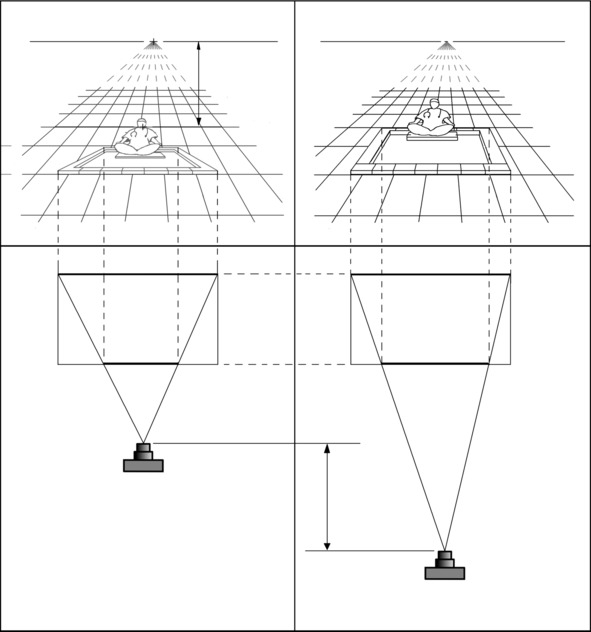
In the left picture.
The distance of taking a preliminary photograph of the pool. The distance from which the pool was photographed is small. You can understand this by comparing the sizes of the near (front) and far (rear) sides of the pool in the photo. The larger on photograph the difference in the length of the front and rear sides of the pool, the smaller the distance from which the pool was photographed.
In the right picture.
The distance the picture was taken. The distance from which they look at the picture more. You can understand this by comparing the sizes of the near (front) and far (rear) sides of the pool in the photo. The smaller the difference in the length of the front and rear sides of the pool, the more the pool was photographed from a greater distance.
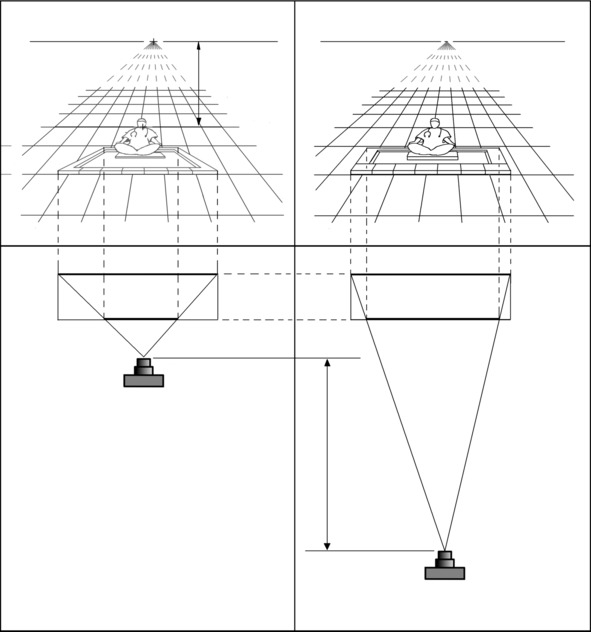
If you draw a pool (in the right picture) less in the depth of the picture, as deep as in the original picture, the difference in the distances to the camera will increase even more.
Never point out errors
if you don’t know how to fix them.
Bernard ShowFollowing the advice of Bernard Shaw.
I point out errors, knowing how to fix them, or how to prevent such mistakes.
How to correctly build the perspective of such drawings, step by step, and will be available in one of the next books of this course. Or in one of the lessons on my Patreon page.
https://www.patreon.com/ArtistFarit
In the chapter or exercise “Parallelepipeds’.
These were drawings with obvious errors in the perspective, which, I hope, can be seen by all, or most viewers, most beginners and experienced artists.
Further there will be less noticeable errors in building the perspective of the picture. I deliberately did not draw the details of these drawings, so that it was harder to recognize. In order not to offend the artists who made these mistakes. These are very talented artists, I have not yet learned how to draw like them.
But I saved the distortion of perspective in the form in which the original drawings had them.
Next example
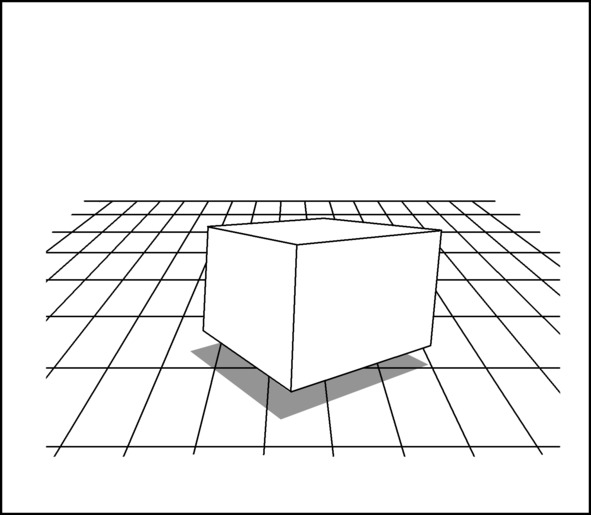
Many may say that this cube is drawn correctly. In my humble opinion, this cube is drawn from a photograph. The horizon of the photograph on which this cube was drawn is much lower than the horizon of the platform on which this drawing is drawn. Therefore, I get the impression that the cube is very distorted. In my humble opinion, a preliminary photograph of this cube was taken from a lower point, and from a closer distance than the viewer looks at this picture. Therefore, the top face of the cube, I see not parallel to the floor surface. In my opinion, the top face of the cube is strongly inclined from the viewer.
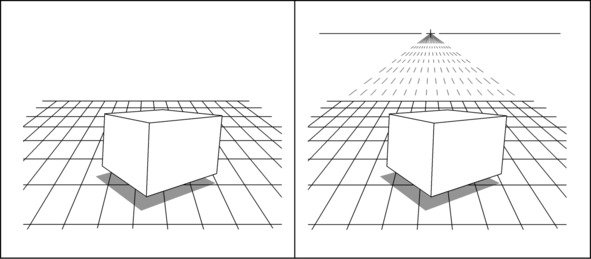
To prove my point, a rectangular tile on the floor in this room helps me. We continue the seams of the rectangular tiles, and find the horizon of this site.
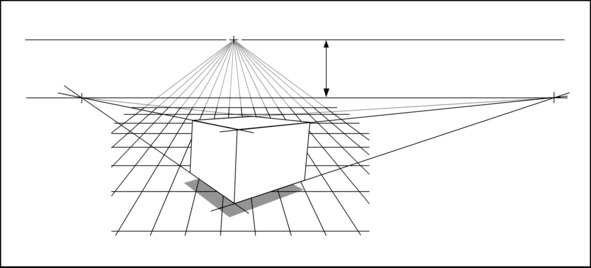
Now we find the horizon of the original photograph of the cube from which this drawing was made. The horizon of the cube (parallelepiped) can be found by continuing the horizontal sides of the cube if these sides are on the surface of the site or parallel to the surface of the site. Continue the horizontal sides of the cube until they intersect with each other. The continuation of the horizontal sides of the cube intersects at the horizon line of the photograph with which the cube was drawn. As you can see the horizon of the site and the horizon of the photo of the cube do much not coincide.
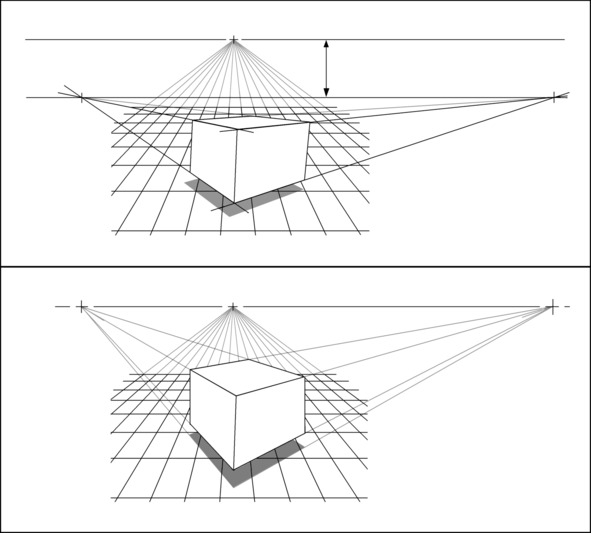
The top picture is the original.
In the bottom picture.
The cube is drawn so that its horizon coincides with the horizon of the site. In this case, the top face of the cube looks parallel to the floor surface of the room. Something like this should look like a cube drawn according to the laws of perspective (geometry), and not according to a photograph. Try to quickly look from the top picture to the bottom picture. Distortion of perspective becomes apparent. In any case, I can see.
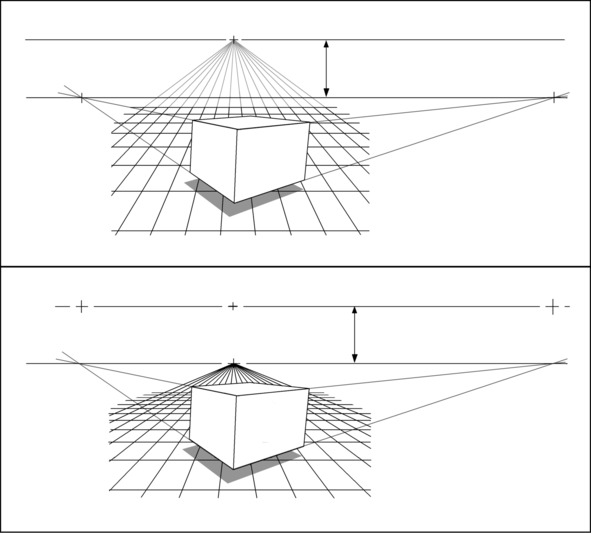
The top picture is the original.
In the bottom picture.
The original cube is left, but a new area is drawn with the horizon matching the horizon of the cube. This is what the photograph used to draw this cube looked like.
There remains one POSSIBLE “mistake” – the mismatch between the distance from which the cube was photographed and the distance from which the viewer looks at the picture. That is why I have the impression that the near corner of the base of the cube is not straight, but sharp. Such a “mistake” can be obtained because the cube was photographed from a closer distance than the viewer looks at the drawing of the cube.
This possible “mistake” could be easily verified if the seams of the rectangular tile were parallel to one of the sides of the base of the cube. But in this figure, the seams of the tile are not parallel to the sides of the base of the cube, and it is not possible to check this possible error. Also, this possible “mistake” could be checked if the plates on the floor were square, but the plates on the floor of this room were not square, but rectangular.
How to draw a cube and the shadow of a cube correctly will be described and illustrated in detail in of this course. Or in one of the lessons on my Patreon page.
https://www.patreon.com/ArtistFarit
In the chapter or exercise “Parallelepipeds.”
Next example
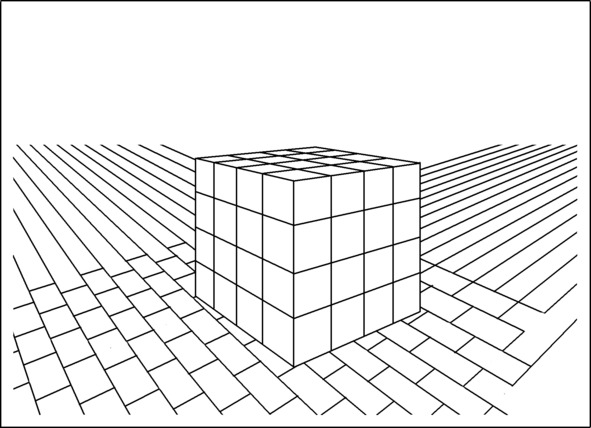
A large cube made of small cubes. In terms of painting, the cube is drawn wonderfully. From a perspective point of view, the cube is drawn with small errors.
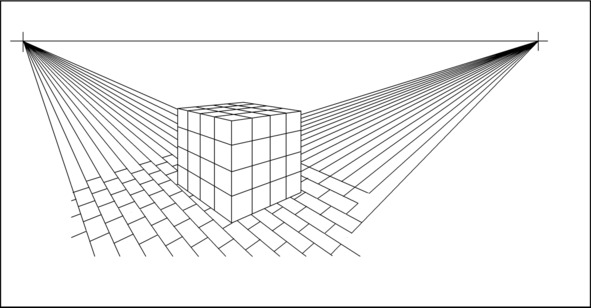
The cube is drawn on a rectangular paving slab. Continuing the seams of the tiles, we find the horizon line of this site. Tile seams intersect at the site’s skyline.
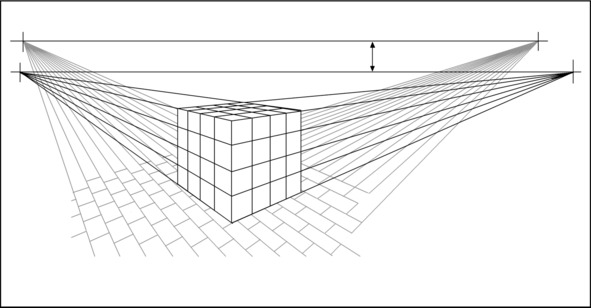
Continuing the horizontal sides of the cube, we find the horizon of the original photo (or sketch) of the cube. The horizon of the site and the horizon of the photograph, or the sketch on which the drawing was drawn, do not match. The discrepancy of the horizon lines is insignificant, but noticeable.
The discrepancy between the horizon line of the site and the horizon of the drawn object is not the only way to prove that the cube is drawn with slight violations of the laws of perspective.
In this photograph there is further evidence that the drawing is drawn from a photograph, or from a sketch. But not a way to build a projection.
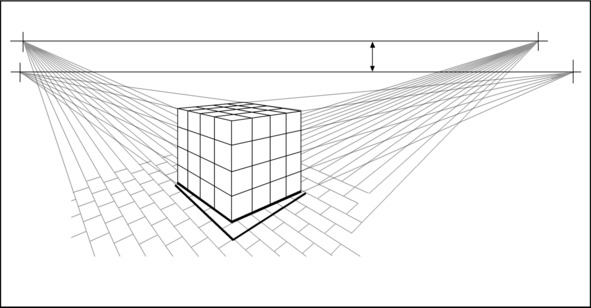
Look at the right angle of the paving slabs and the “right angle” of the bottom face of the cube. Agree that all the corners of the bottom face of the cube should be straight (90 degrees). Unless, of course, a cube is drawn in this figure, and not a prism with a base in the form of a rhombus or parallelogram. The closest to us (and any) corner of the base of the cube should be straight. What do we see in the picture (and in the picture of the picture)? The pavement tile is rectangular, of which I have no doubt. It turns out that for the drawn cube, the angle closest to us is not a straight line, not 90 degrees. It can be assumed that the near corner does not lie on the surface, but hangs above the surface. In this case, under the cube, there should be a shadow. There is no shadow in the figure, which means that a cube is drawn that lies on the surface with its entire base.
Why do you get such errors?
First reason.
The cube is photographed (or drawn) at an angle slightly different from the viewing angle of the picture.
Second reason.
The photograph of the cube was also taken from a different distance that does not coincide with the distance from the drawing to the viewer. Or the sketch was drawn “by eye” without taking into account the laws of perspective.
The following figure shows three options for the relationship, the distance from which the 3D drawing of the cube was photographed, and the distance from the camera to the cube in the preliminary photograph or sketch.
Конец ознакомительного фрагмента.
Текст предоставлен ООО «ЛитРес».
Прочитайте эту книгу целиком, купив полную легальную версию на ЛитРес.
Безопасно оплатить книгу можно банковской картой Visa, MasterCard, Maestro, со счета мобильного телефона, с платежного терминала, в салоне МТС или Связной, через PayPal, WebMoney, Яндекс.Деньги, QIWI Кошелек, бонусными картами или другим удобным Вам способом.

